Difference between revisions of "Home Automation Kits with pcDuino and BLE4.0"
(→Install openHAB) |
(→Package List) |
||
| (6 intermediate revisions by the same user not shown) | |||
| Line 25: | Line 25: | ||
We need to install python serial first before we can use serial from pcDuino3B by doing: | We need to install python serial first before we can use serial from pcDuino3B by doing: | ||
| − | + | [[File:Code.jpg| 600px]] | |
| − | |||
| − | |||
| − | |||
| − | + | [[File:Code 1.jpg| 600px]] | |
| − | |||
| − | |||
| − | |||
| − | |||
| − | |||
| − | |||
| − | |||
| − | |||
| − | |||
| − | |||
| − | |||
| − | |||
| − | |||
| − | |||
| − | |||
| − | |||
| − | |||
| − | |||
| − | |||
| − | |||
| − | |||
| − | |||
| − | |||
| − | |||
| − | |||
| − | |||
| − | |||
| − | |||
| − | |||
| − | |||
| − | |||
| − | |||
| − | |||
| − | |||
| − | |||
| − | |||
| − | |||
| − | |||
| − | |||
| − | |||
| − | |||
| − | |||
| − | |||
| − | |||
| − | |||
| − | |||
| − | |||
| − | |||
| − | |||
| − | |||
| − | |||
| − | |||
| − | |||
| − | |||
| − | |||
| − | |||
| − | |||
| − | |||
| − | |||
| − | |||
| − | |||
| − | |||
| − | |||
| − | |||
| − | |||
| − | |||
| − | |||
| − | |||
| − | |||
| − | |||
| − | |||
| − | |||
| − | |||
| − | |||
| − | |||
| − | |||
| − | |||
| − | |||
| − | |||
| − | |||
| − | |||
| − | |||
| − | |||
| − | |||
| − | |||
| − | |||
| − | |||
| − | |||
| − | |||
| − | |||
| − | |||
| − | |||
| − | |||
| − | |||
| − | |||
| − | |||
| − | |||
| − | |||
| − | |||
| − | |||
| − | |||
| − | |||
| − | |||
| − | |||
| − | |||
| − | |||
| − | |||
| − | |||
| − | |||
| − | |||
| − | |||
| − | |||
| − | |||
| − | |||
| − | |||
| − | |||
| − | |||
| − | |||
| − | |||
| − | |||
| − | |||
| − | |||
| − | |||
| − | |||
| − | |||
| − | |||
| − | |||
| − | |||
| − | |||
| − | |||
| − | |||
| − | |||
| − | |||
| − | |||
| − | |||
| − | |||
| − | |||
| − | |||
| − | |||
| − | |||
| − | |||
| − | |||
| − | |||
| − | |||
| − | |||
| − | |||
| − | |||
| − | |||
| − | |||
| − | |||
| − | |||
| − | |||
| − | |||
| − | |||
| − | |||
| − | |||
| − | |||
| − | |||
| − | |||
| − | |||
| − | |||
| − | |||
| − | |||
| − | |||
| − | |||
| − | |||
| − | |||
| − | |||
| − | |||
| − | |||
| − | |||
| − | |||
| − | |||
| − | |||
| − | |||
| − | |||
| − | |||
| − | |||
| − | |||
| − | |||
| − | |||
| − | |||
| − | |||
| − | |||
| − | |||
| − | |||
| − | |||
| − | |||
| − | |||
| − | + | [[File:Code 2.jpg| 600px]] | |
| − | |||
| − | 2 | ||
| − | |||
| − | |||
| − | |||
| − | |||
| − | |||
| − | |||
| − | |||
| − | |||
| − | |||
| − | |||
| − | |||
| − | |||
| − | |||
| − | |||
| − | |||
| − | |||
| − | |||
| − | |||
| − | |||
| − | |||
| − | |||
| − | |||
| − | |||
| − | |||
| − | |||
| − | |||
| − | |||
| − | |||
| − | |||
| − | |||
| − | |||
| − | |||
| − | |||
| − | |||
| − | |||
| − | |||
| − | |||
| − | |||
| − | |||
| − | |||
| − | |||
| − | |||
| − | |||
| − | |||
| − | |||
| − | |||
| − | |||
| − | |||
| − | |||
| − | |||
| − | |||
| − | |||
| − | |||
| − | |||
| − | |||
| − | |||
| − | |||
| − | |||
| − | |||
| − | |||
| − | |||
| − | |||
| − | |||
| − | |||
| − | |||
| − | |||
| − | |||
| − | |||
| − | |||
| − | |||
| − | |||
| − | |||
| − | |||
| − | + | [[File:Code 3.jpg| 600px]] | |
| − | + | ||
| − | + | [[File:Code 4.jpg| 600px]] | |
| − | + | ||
| − | + | == Hardware Perparation == | |
| − | + | ||
| − | + | pcduino3 x1 | |
| − | + | ||
| − | + | ArduinoUNO x1 | |
| − | + | ||
| − | + | BLE4.0 Bee x1 | |
| − | + | ||
| − | + | BLE4.0 Shield x1 | |
| − | + | ||
| − | + | Xbee Shield x1 | |
| − | + | ||
| − | + | Door Sensor x1 | |
| − | + | ||
| − | + | Linker LED x1 | |
| − | + | ||
| − | + | pcDuino3 x1 | |
| − | + | ||
| − | + | == Test Execution == | |
| − | + | ||
| − | + | '''(1) install openhab on pcDuino and APP on mobile device:''' | |
| − | + | ||
| − | + | [[File:Test.jpg| 600px]] | |
| − | + | ||
| − | + | '''(2) build a file “mqtt-BLE.py”, copy the code of python-mqtt in it, remember to edit IP address to the IP address that read now:''' | |
| − | + | ||
| − | + | *'''edit IP address based on distribution by pcDuino ( check by $ifconfig ), following is the location:''' | |
| − | + | ||
| − | + | [[File:Test 1.jpg| 600px]] | |
| − | + | ||
| − | + | '''(3) open “/home/ubuntu/c_environment/sample”, add a c file, copy the test code in it (need to add socket in Makefile of current directory, besides, edit IP address into ( the same as (2) ) ;''' | |
| − | + | ||
| − | + | [[File:Test 2.jpg| 600px]] | |
| − | + | ||
| − | + | '''(4) Connect the door sensor to D8 and GND of Arduino (set D8 as pull-up input, when the magnet of the door sensor approached, the IO level will drop ) , then connect linker LED to D13 and GND of Arduino, and install BLE4.0 Xbee on Arduino, and then download the test code of Arduino ( both switches of Xbee Shield should on the left side) :''' | |
| − | + | ||
| − | + | [[File:Test 3.jpg| 600px]] | |
| − | + | ||
| − | + | [[File:Test 4.jpg| 600px]] | |
| − | + | ||
| − | + | '''(5) turn on pcDuino, run openhab, python MQTT, socket:''' | |
| − | + | ||
| − | + | '''#turn on openhab:''' | |
| − | + | ||
| − | + | '''$cd/opt/openhab''' | |
| − | + | ||
| − | + | '''$sudo ./start.sh''' | |
| − | # | + | |
| − | + | '''(if openhab mirror image has been build, add a self-start in it : sudo /opt/openhab/start.sh )''' | |
| − | + | ||
| − | + | '''#run MQTT :''' | |
| − | + | ||
| − | + | '''$cd/ home/ ubutu''' | |
| − | + | ||
| − | + | '''$sudo python ./mqtt_publish.py''' | |
| − | + | ||
| − | + | [[File:Test 5.jpg| 400px]] | |
| − | + | ||
| − | + | '''#run socket ( this program should be run after python mqtt ):''' | |
| − | + | ||
| − | + | '''$cd /home/ubuntu/c_enviroment/sample''' | |
| − | + | ||
| − | + | '''$sudo ./socket''' | |
| − | + | ||
| − | + | '''(6) the socket connection was build, after the program above start up.''' | |
| − | + | ||
| − | + | '''(7) Now we can open the APP of mobile device, click settings, edit setting below :''' | |
| − | + | ||
| − | + | [[File:Test 6.jpg| 600px]] | |
| − | + | ||
| − | + | '''Edit IP address based on pcDuino, set up user name and code as following:''' | |
| − | + | ||
| − | + | '''$cd /opt/openhab/configurations''' | |
| − | + | ||
| − | + | '''$vim ./users.cfg''' | |
| − | + | ||
| − | + | '''“test” is user name, “12345678” is code.''' | |
| − | + | ||
| − | + | [[File:Test 7.jpg| 600px]] | |
| − | + | ||
| − | + | '''(8) after setting, click “save” at right side, then it will be return to the main interface ( click button can control light) :''' | |
| − | + | ||
| − | + | '''#when door is open, LED turn off :''' | |
| − | + | ||
| − | + | [[File:Test 8.jpg| 600px]] | |
| − | + | ||
| − | + | [[File:Test 9.jpg| 600px]] | |
| − | + | ||
| − | + | '''#when door is close, LED will open :''' | |
| − | + | ||
| − | + | [[File:Test 10.jpg| 600px]] | |
| − | + | ||
| − | + | [[File:Test 11.jpg| 600px]] | |
| + | |||
| + | = Package List = | ||
| + | |||
| + | *1 X [http://linksprite.com/wiki/index.php5?title=PcDuino3B PcDuino3B][MP_PCDUINO3B][102305006] | ||
| + | |||
| + | *1 X [http://linksprite.com/wiki/index.php5?title=Bluetooth_4.0_BLE_Pro_Shield_for_Arduino_(Master/Slave_and_iBeacon) Bluetooth 4.0 BLE Pro Shield for Arduino(Master/Slave and iBeacon)][SHD_BLE4_Pro][101101133] | ||
| + | |||
| + | *1 X Arduino UNO | ||
| + | |||
| + | *1 X [http://linksprite.com/wiki/index.php5?title=Bluetooth_4.0_BLE_Pro_Xbee_Form_factor_(Master/Slave_and_iBeacon) Bluetooth 4.0 BLE Pro Xbee Form factor (Master/Slave and iBeacon)][BB_XBEE_BLE4][105101117] | ||
| + | |||
| + | *1 X [http://linksprite.com/wiki/index.php5?title=Xbee_Shield Xbee Shield][SHD_XBEE][101101017] | ||
| + | |||
| + | *1 X Access control sensor | ||
| + | |||
| + | *1 X battery case | ||
| + | |||
| + | *1 X Dupont Line | ||
| + | |||
| + | *1 X [http://linksprite.com/wiki/index.php5?title=Mosfet_Module Mosfet Module][LINKER_SSR][118101014] | ||
| + | |||
| + | *1 X Power Supply for pcDuino | ||
| + | |||
| + | *1 X microUSB Line | ||
| + | |||
| + | *1 X plastic box | ||
Latest revision as of 07:55, 19 July 2016
Contents
Introduction
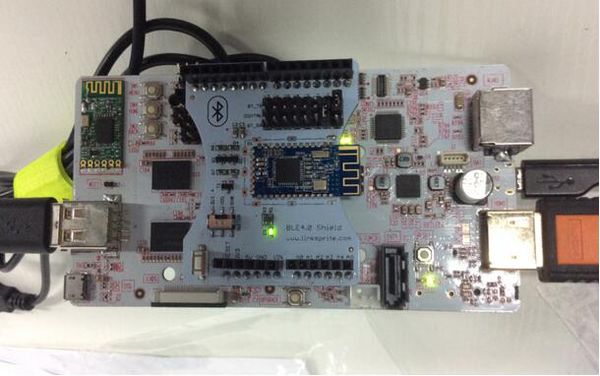
Before this article, there is post about DIY Smart home connecting through Wifi. Nowadays, the wearable devices such as smartbands and smart watch are extremely popular. So it’s time to talk about Bluetooth4.0, this article is all about how to DIY your own smart home using BLE4.0 Shield and BLE4.0 Bee as connection devices, pcduino as openhab server, Arduino as device.
Usage
Install openHAB
Install openHAB server software on pcDuino, get more detail form linksprite learn center:
http://learn.linksprite.com/?s=openhab
or, download the image file below, then update ( install openh under “/opt/openhab” folder):
http://pan.baidu.com/s/1ntHtCyX?qq-pf-to=pcqq.c2c code: fh6c
For more detail about how to use BLE4.0 shield ( the usage of BLE4.0 Bee is the same as BLE4.0 Shield )
http://learn.linksprite.com/arduino/shields/how-to-use-ble4-0-shield/
Test Code
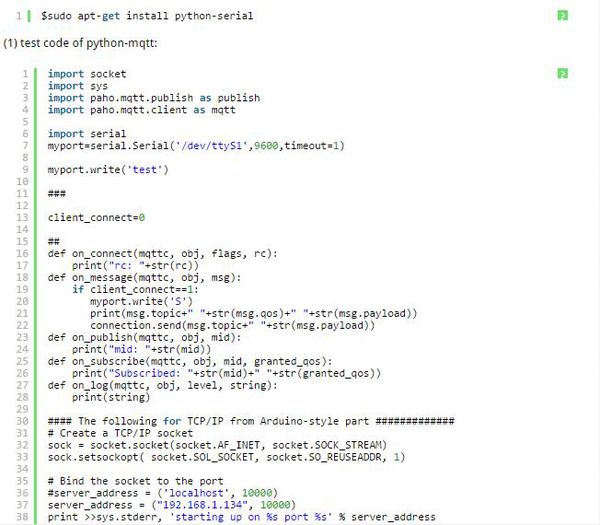
We need to install python serial first before we can use serial from pcDuino3B by doing:
Hardware Perparation
pcduino3 x1
ArduinoUNO x1
BLE4.0 Bee x1
BLE4.0 Shield x1
Xbee Shield x1
Door Sensor x1
Linker LED x1
pcDuino3 x1
Test Execution
(1) install openhab on pcDuino and APP on mobile device:
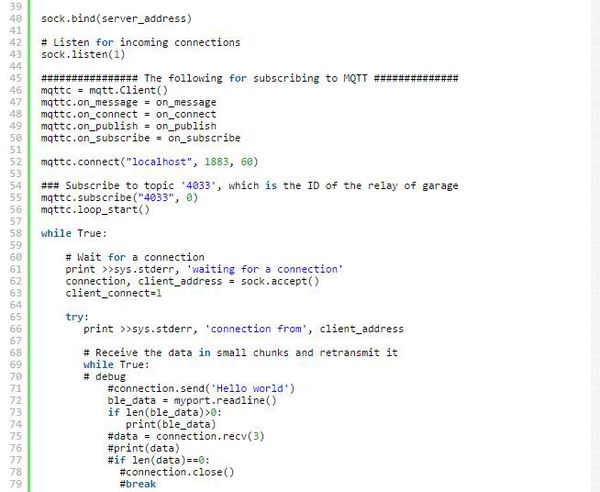
(2) build a file “mqtt-BLE.py”, copy the code of python-mqtt in it, remember to edit IP address to the IP address that read now:
- edit IP address based on distribution by pcDuino ( check by $ifconfig ), following is the location:
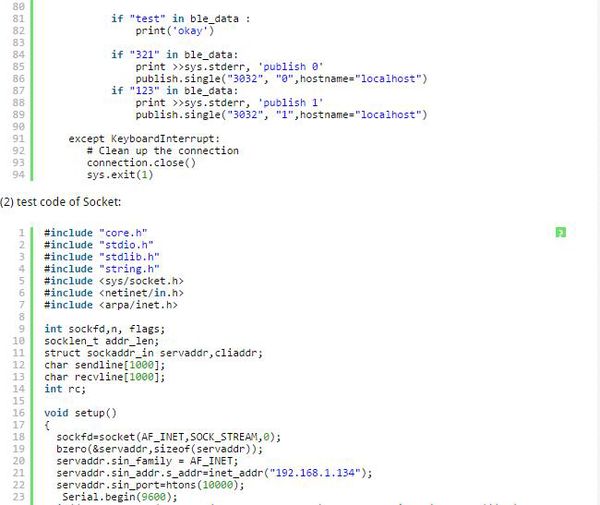
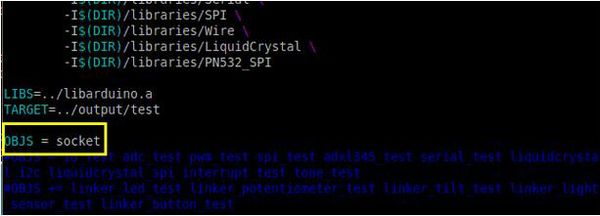
(3) open “/home/ubuntu/c_environment/sample”, add a c file, copy the test code in it (need to add socket in Makefile of current directory, besides, edit IP address into ( the same as (2) ) ;
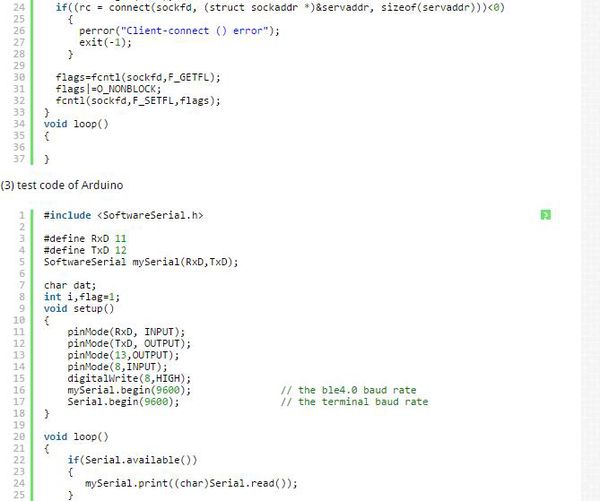
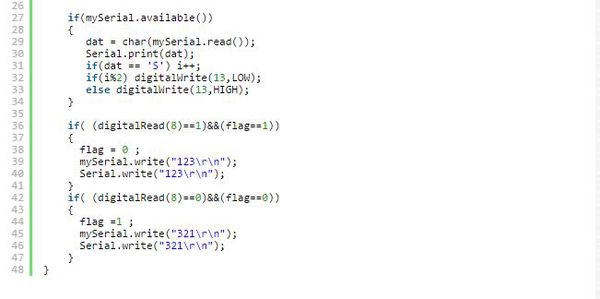
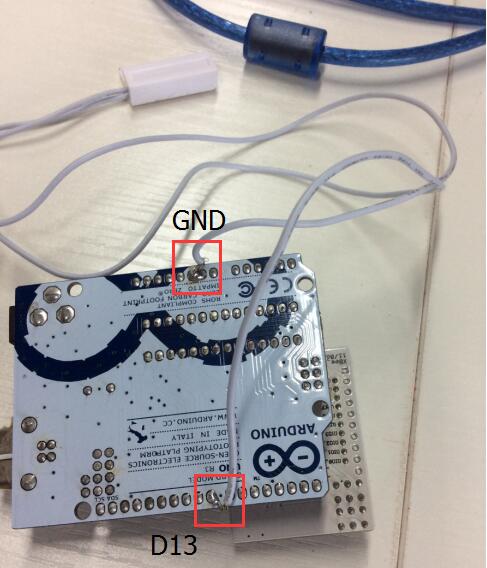
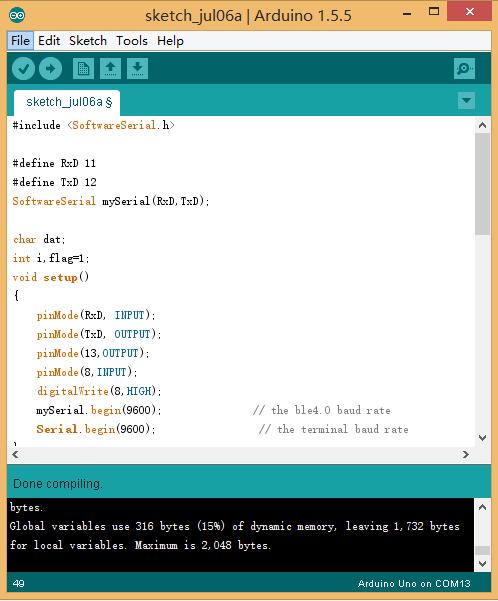
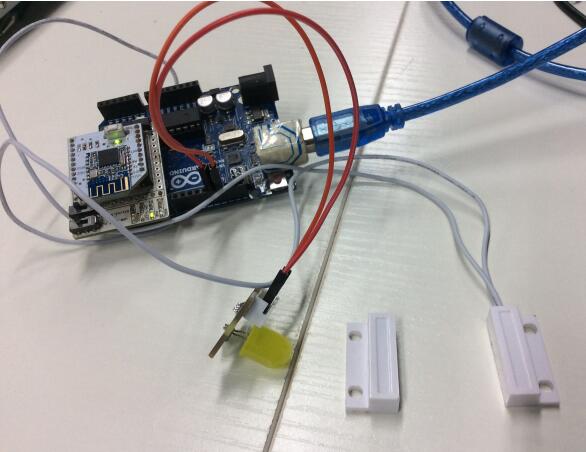
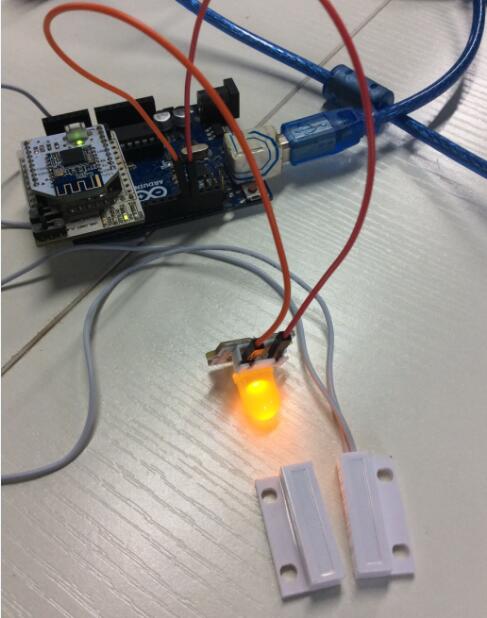
(4) Connect the door sensor to D8 and GND of Arduino (set D8 as pull-up input, when the magnet of the door sensor approached, the IO level will drop ) , then connect linker LED to D13 and GND of Arduino, and install BLE4.0 Xbee on Arduino, and then download the test code of Arduino ( both switches of Xbee Shield should on the left side) :
(5) turn on pcDuino, run openhab, python MQTT, socket:
#turn on openhab:
$cd/opt/openhab
$sudo ./start.sh
(if openhab mirror image has been build, add a self-start in it : sudo /opt/openhab/start.sh )
#run MQTT :
$cd/ home/ ubutu
$sudo python ./mqtt_publish.py
#run socket ( this program should be run after python mqtt ):
$cd /home/ubuntu/c_enviroment/sample
$sudo ./socket
(6) the socket connection was build, after the program above start up.
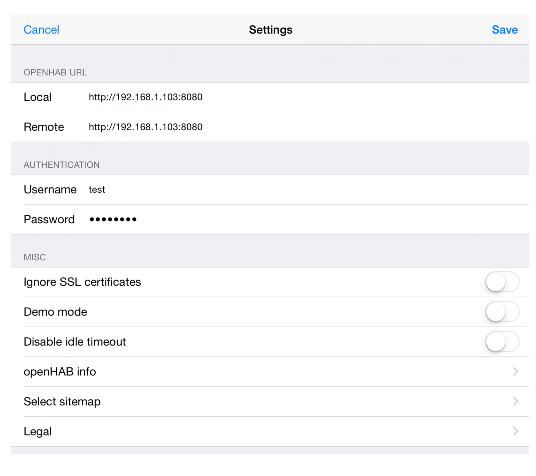
(7) Now we can open the APP of mobile device, click settings, edit setting below :
Edit IP address based on pcDuino, set up user name and code as following:
$cd /opt/openhab/configurations
$vim ./users.cfg
“test” is user name, “12345678” is code.
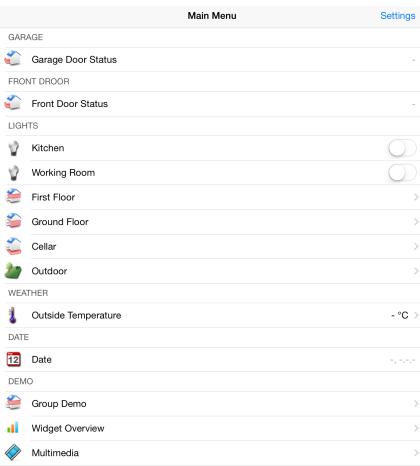
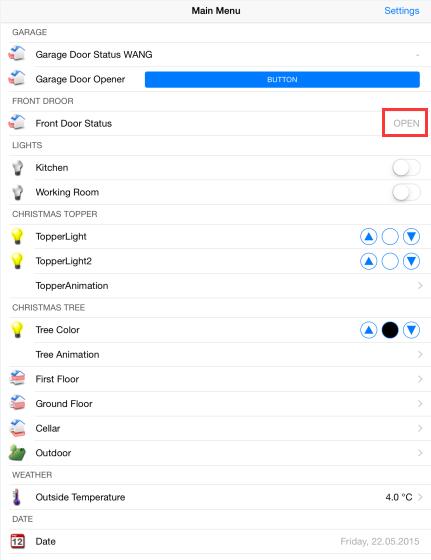
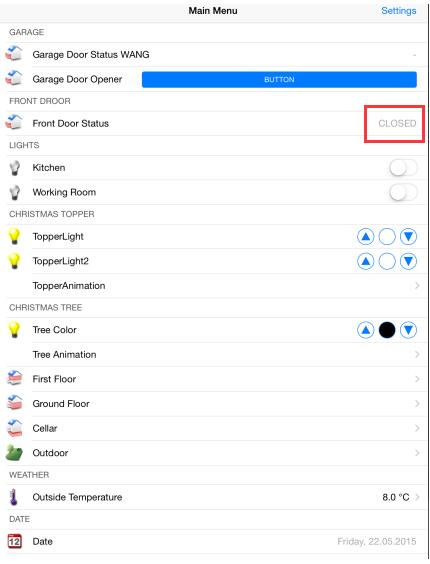
(8) after setting, click “save” at right side, then it will be return to the main interface ( click button can control light) :
#when door is open, LED turn off :
#when door is close, LED will open :
Package List
- 1 X PcDuino3B[MP_PCDUINO3B][102305006]
- 1 X Bluetooth 4.0 BLE Pro Shield for Arduino(Master/Slave and iBeacon)[SHD_BLE4_Pro][101101133]
- 1 X Arduino UNO
- 1 X Bluetooth 4.0 BLE Pro Xbee Form factor (Master/Slave and iBeacon)[BB_XBEE_BLE4][105101117]
- 1 X Xbee Shield[SHD_XBEE][101101017]
- 1 X Access control sensor
- 1 X battery case
- 1 X Dupont Line
- 1 X Mosfet Module[LINKER_SSR][118101014]
- 1 X Power Supply for pcDuino
- 1 X microUSB Line
- 1 X plastic box
