Difference between revisions of "LinkNode core STM32 Kit"
(→Introduction) |
(→Package List) |
||
| (2 intermediate revisions by the same user not shown) | |||
| Line 1: | Line 1: | ||
== Introduction == | == Introduction == | ||
| − | [[File:STM32 KIT A.png]] | + | [[File:STM32 KIT A 2.png]] |
| − | [[File:STM32 KIT C.png]] | + | [[File:STM32 KIT C 2.png]] |
[[File:STM32core.png|600px]] | [[File:STM32core.png|600px]] | ||
| Line 160: | Line 160: | ||
*Linker Base for LinkNode x 1 | *Linker Base for LinkNode x 1 | ||
| − | *LinkNode Module Tem&RH Sensor-AM2302 x 1 | + | *[http://linksprite.com/wiki/index.php5?title=LinkNode_Temperature_and_Humidity_Sensor_Module LinkNode Module Tem&RH Sensor-AM2302] [LINKER_LN_TEM&HUM][] x 1 |
| − | *LinkNode Module Buzzer x 1 | + | *[http://linksprite.com/wiki/index.php5?title=LinkNode_Buzzer_Module LinkNode Module Buzzer] [LINKER_LN_BUZZER][] x 1 |
| − | *LinkNode Module Pressure Sensor x 1 | + | *[http://linksprite.com/wiki/index.php5?title=LinkNode_Pressure_Sensor_Module LinkNode Module Pressure Sensor] [LINKER_LN_BMP280][]x 1 |
| − | *LinkNode Module Light Sensor x 1 | + | *[http://linksprite.com/wiki/index.php5?title=LinkNode_Light_Sensor_Module LinkNode Module Light Sensor] [LINKER_LN_LIGHT][]x 1 |
| − | * | + | *[http://linksprite.com/wiki/index.php5?title=LinkNode_Infrared_Emitter_Module LinkNode Module Infraed Emitter] [LINKER_LN_INFEM][]x 1 |
| − | |||
| − | |||
*LinkNode Module Thumb Joystick x 1 | *LinkNode Module Thumb Joystick x 1 | ||
| − | *LinkNode Module Relay x 1 | + | *[http://linksprite.com/wiki/index.php5?title=LinkNode_Relay_1Channel_Module LinkNode Module Relay] [LINKER_LN_RELAY][]x 1 |
| − | *LinkNode Module 4Dig-7Seg x 1 | + | *[http://linksprite.com/wiki/index.php5?title=LinkNode_4-Digit_7-Segment_Module LinkNode Module 4Dig-7Seg] [LINKER_LN_4D7S] []x 1 |
| − | *LinkNode Module LED x 1 | + | *[http://linksprite.com/wiki/index.php5?title=LinkNode_5mm_Red_LED_Module LinkNode Module LED] [LINKER_LN_5MMRED][]x 1 |
| − | *LinkNode Module Button x 1 | + | *[http://linksprite.com/wiki/index.php5?title=LinkNode_12mm_Button_Module LinkNode Module Button] [LINKER_LN_BUTTON][]x 1 |
Latest revision as of 03:17, 13 December 2016
Contents
Introduction
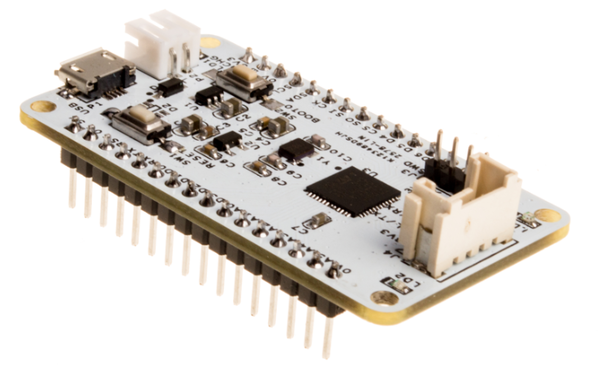
LinkNode core STM32 is Mbed-compatible development board which is powered by the high integrated chip STM32F411CEU6.
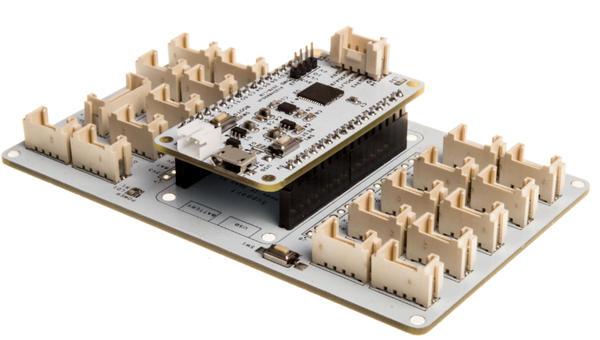
Thanks for the Mbed OS,We use NUCLEO f411 mbed platform source code,according to our board to modify the program, so that it can run in the LinkNode Core STM32 and now supports offline compilation and download programming is fully compatible with MBED OS, At the same time, LinkNode core STM32 has Linker Base which make it very easy to connect to LinkNode Sensors.
Features
- Powered by STM32F411CE
- 10 Digital I/O pins
- 6 Analog Input pin
- 1 micro USB port for power
- Download and debug program with Jlink SW
- Download Program with Uart1
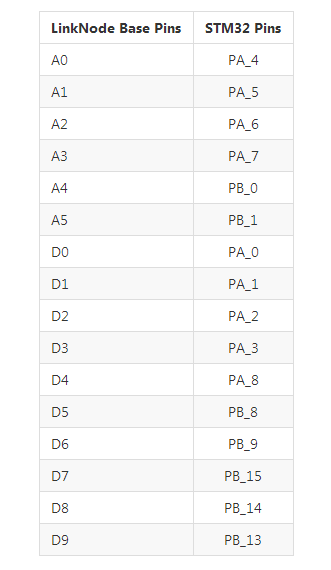
Pin Mapping
Tutorials
- Download Keil uVision5 and install it
- Download LinkNode core STM32 program
- Prepare USB to TTL Module or Jlink
1.Blink LED
- Open the program with Keil Uvision5
- Connect LinkNode core STM32 to your PC with Jlink or Uart
- Write the code as below and download it
- LinkNode Base for LinkNode LED2 will blink
#include "mbed.h"
DigitalInOut led(LED2);

int main()
{
    while (true)
    {
        led = 1;
        wait(0.5);
        led = 0;
        wait(0.5);
     }
}
2.Serial print Hello World
- Open the program with Keil Uvision5
- Connect LinkNode core STM32 to your PC with Uart
- Write the code as below and download it
- Open the PC serial port tools,set the appropriate parameters
- You will see serial print "Hello LinkNode!\n"
#include "mbed.h"

Serial pc(SERIAL_TX,SERIAL_RX);

int main()
{
    pc.baud(115200);
    while(1)
    {
        pc.printf("Hello LinkNode!\n");
        wait(1);
    }
}
3.LinkNode Sensor Beep
- Open the program with Keil Uvision5
- Connect LinkNode core STM32 to your PC with Jlink or Uart
- Connect LinkNode Sensor Beep to LinkNode Base
- Write the code as below and download it
- The Buzzer will beep
#include "mbed.h"
#include "Beep.h"

BEEP Beep(D5);

int main()
{
    int hz = 1000;
    int time_ms = 1000;
    while(1)
    {
        Beep.Start(hz,time_ms);
        wait(10);
    }
}
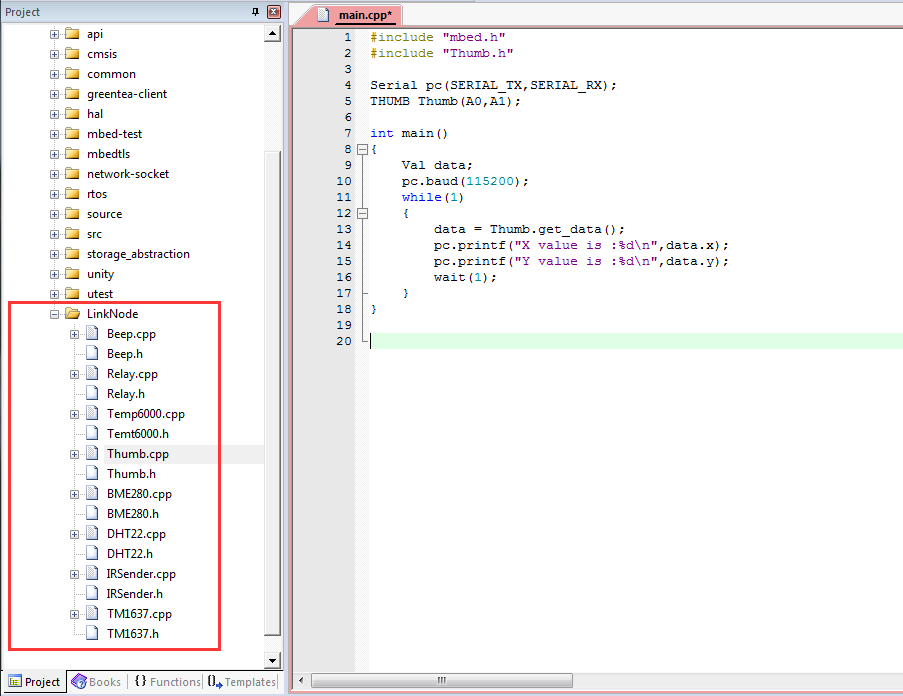
4.LinkNode Snesor Thumb Joystick
- Open the program with Keil Uvision5
- Connect LinkNode core STM32 to your PC with Uart
- Connect LinkNode Sensor Thumb Joystick to LinkNode Base
- Write the code as below and download it
- Open the PC serial port tools,set the appropriate parameters
- You will see serial print value
#include "mbed.h"
#include "Thumb.h"

Serial pc(SERIAL_TX,SERIAL_RX);
THUMB Thumb(A0,A1);

int main()
{
    Val data;
    pc.baud(115200);
    while(1)
    {
        data = Thumb.get_data();
        pc.printf("X value is :%d\n",data.x);
        pc.printf("Y value is :%d\n",data.y);
        wait(1);
    }
}
5.More LinkNode Sensors
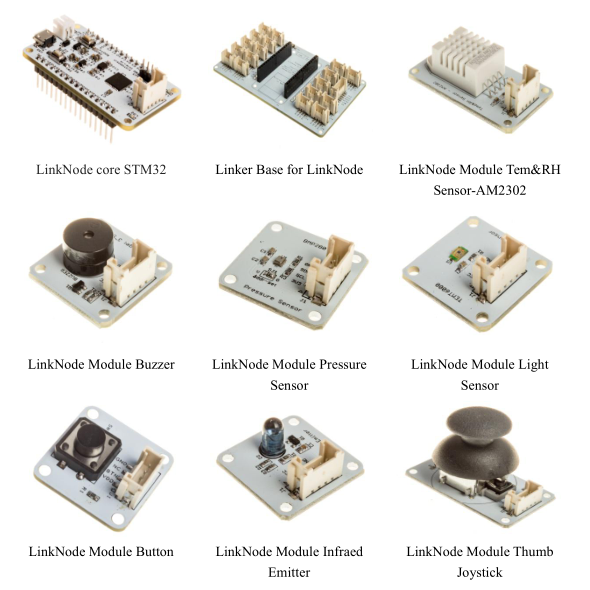
Package List
- LinkNode core STM32 x 1
- Linker Base for LinkNode x 1
- LinkNode Module Tem&RH Sensor-AM2302 [LINKER_LN_TEM&HUM][] x 1
- LinkNode Module Buzzer [LINKER_LN_BUZZER][] x 1
- LinkNode Module Pressure Sensor [LINKER_LN_BMP280][]x 1
- LinkNode Module Light Sensor [LINKER_LN_LIGHT][]x 1
- LinkNode Module Infraed Emitter [LINKER_LN_INFEM][]x 1
- LinkNode Module Thumb Joystick x 1
- LinkNode Module Relay [LINKER_LN_RELAY][]x 1
- LinkNode Module 4Dig-7Seg [LINKER_LN_4D7S] []x 1
- LinkNode Module LED [LINKER_LN_5MMRED][]x 1
- LinkNode Module Button [LINKER_LN_BUTTON][]x 1
