Difference between revisions of "Buzzer"
Katherine.d (talk | contribs) (→Connection Diagram) |
Yajuan.dai (talk | contribs) (→Introduction) |
||
| (10 intermediate revisions by one other user not shown) | |||
| Line 1: | Line 1: | ||
==Introduction== | ==Introduction== | ||
| − | + | A piezoelectric buzzer is an audio signalling device. A sample piezoelectric buzzer is shown below. | |
| − | |||
| − | |||
| − | + | Typical uses include alarm devices, timers and confirmation of user input such as a mouse click or keystroke. | |
| − | * | + | [[File:buzzer 1.jpg | 300px]] |
| + | |||
| + | |||
| + | ===Adjustable coupling=== | ||
| + | **[http://linksprite.com/wiki/index.php5?title=Sensors_Pack_for_Arduino Sensors Pack for Arduino] [KIT_SENPACK] | ||
| + | |||
| + | == Example Project == | ||
| + | |||
| + | === Hardware Preparation === | ||
| + | |||
| + | *Arduino Duemilanove or Compatible Arduino Controller (1 unit) | ||
*Buzzer (1 unit) | *Buzzer (1 unit) | ||
*Prototyping Shield (1 unit) | *Prototyping Shield (1 unit) | ||
| Line 13: | Line 21: | ||
*Jumper Cables (2 units) | *Jumper Cables (2 units) | ||
| − | |||
| − | |||
[[File:buzzer.jpg | 400px]] | [[File:buzzer.jpg | 400px]] | ||
| − | == | + | === Programming === |
| − | < | + | <syntaxhighlight lang="c"> |
//For Arduino Start kit | //For Arduino Start kit | ||
//Compatible with all Arduino version | //Compatible with all Arduino version | ||
| − | // | + | // |
| − | // | + | // |
| − | |||
int buzzer=8;//Connect the buzz positive Pin to Digital Pin 8 | int buzzer=8;//Connect the buzz positive Pin to Digital Pin 8 | ||
| Line 51: | Line 56: | ||
} | } | ||
} | } | ||
| − | </ | + | </syntaxhighlight> |
Latest revision as of 10:27, 19 August 2014
Contents
Introduction
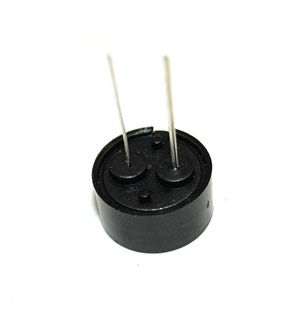
A piezoelectric buzzer is an audio signalling device. A sample piezoelectric buzzer is shown below.
Typical uses include alarm devices, timers and confirmation of user input such as a mouse click or keystroke.
Adjustable coupling
- Sensors Pack for Arduino [KIT_SENPACK]
Example Project
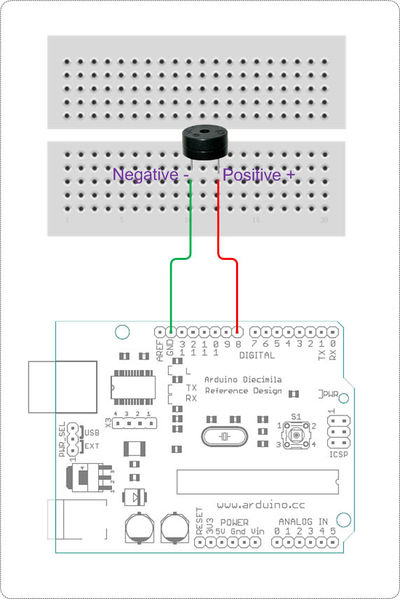
Hardware Preparation
- Arduino Duemilanove or Compatible Arduino Controller (1 unit)
- Buzzer (1 unit)
- Prototyping Shield (1 unit)
- Mini Breadboard (1 unit)
- Jumper Cables (2 units)
Programming
<syntaxhighlight lang="c"> //For Arduino Start kit //Compatible with all Arduino version // //
int buzzer=8;//Connect the buzz positive Pin to Digital Pin 8 void setup() {
pinMode(buzzer,OUTPUT);//Set Pin Mode as output
} void loop() {
 unsigned char i,j;
 while(1)
 {
   for(i=0;i<80;i++) //Sound effect 1
   {
     digitalWrite(buzzer,HIGH);//Make some sound
     delay(1);//Delay 1ms
     digitalWrite(buzzer,LOW);//Be quiet
     delay(1);//Delay 1ms
   }
   for(i=0;i<100;i++) //Sound effect 2
   {
     digitalWrite(buzzer,HIGH);//Make some sound
     delay(2);//Delay 2ms
     digitalWrite(buzzer,LOW);//Be quiet
     delay(2);//Delay 2ms
   }
 }
} </syntaxhighlight>

