Difference between revisions of "Acrylic Frame Robot Platform"
Qian.zhang (talk | contribs) (→Package List) |
Qian.zhang (talk | contribs) (→Package List) |
||
| (13 intermediate revisions by 2 users not shown) | |||
| Line 2: | Line 2: | ||
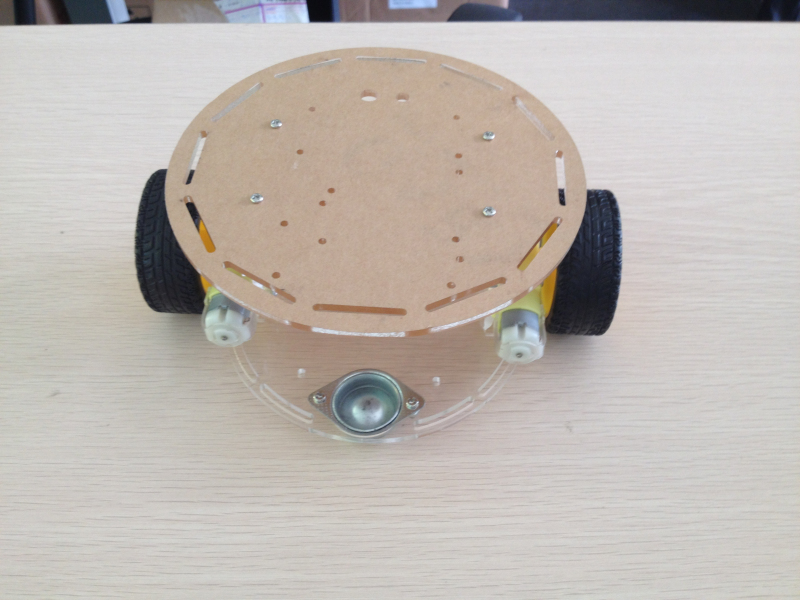
[[File:Acrylic Frame robot platform.jpg]] | [[File:Acrylic Frame robot platform.jpg]] | ||
| + | |||
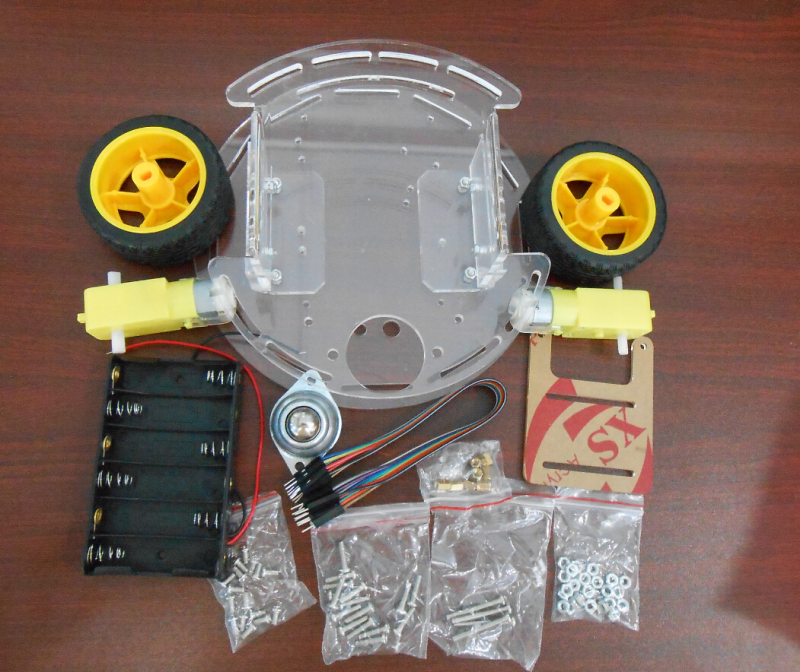
| + | [[File:Acrylic robot package list.jpg]] | ||
| + | |||
| + | == Features == | ||
| + | |||
| + | Dimensions: 182×202×82mm | ||
| + | |||
| + | Net weight: 412g | ||
== Package List == | == Package List == | ||
| − | *1 × Acrylic Top Plate | + | *1 × [http://linksprite.com/wiki/index.php5?title=%E4%BA%9A%E5%85%8B%E5%8A%9B%E5%B0%8F%E8%BD%A6%E8%BD%A6%E8%BA%AB%E5%9C%86%E6%9D%BF_%EF%BC%88Acrylic_Top_Plate) Acrylic Top Plate] [IT_KIT_ACRYTOPPL]] [CA101102] |
| − | *1 × Acrylic Bottom Plate | + | *1 × [http://linksprite.com/wiki/index.php5?title=%E4%BA%9A%E5%85%8B%E5%8A%9B%E5%B0%8F%E8%BD%A6%E8%BD%A6%E8%BA%AB%E6%9D%BF_%EF%BC%88Acrylic_Bottom_Plate%EF%BC%89 Acrylic Bottom Plate] [IT_KIT_ACRYBOTTPL] [CA101103] |
| + | *1 × [http://linksprite.com/wiki/index.php5?title=%E4%BA%9A%E5%85%8B%E5%8A%9B%E5%B0%8F%E8%BD%A6%E8%BD%A6%E8%BA%AB%E8%BF%9E%E6%8E%A5%E6%9D%BF5%E5%AD%94%E4%BD%8D_Acrylic_Connecting_Plate%EF%BC%885_holes%EF%BC%89 Acrylic Connecting Plate(5 holes)] [IT_KIT_ACRY CONNPL5HO][CA101104] | ||
| + | *1 × [http://linksprite.com/wiki/index.php5?title=%E4%BA%9A%E5%85%8B%E5%8A%9B%E5%B0%8F%E8%BD%A6%E8%BD%A6%E8%BA%AB%E8%BF%9E%E6%8E%A5%E6%9D%BF6%E5%AD%94%E4%BD%8D_Acrylic_Connecting_Plate%EF%BC%886_holes%EF%BC%89 Acrylic Connecting Plate(6 holes)] [IT_KIT_ACRY CONNPL6HO][CA101105] | ||
| + | *2 × [http://linksprite.com/wiki/index.php5?title=DC3V-6V%E7%9B%B4%E6%B5%81%E5%87%8F%E9%80%9F%E7%94%B5%E6%9C%BA_%E9%A9%AC%E8%BE%BE Motor] [IT_MOTOR_DC3V_6V] [WH103101] | ||
| + | *2 × [http://linksprite.com/wiki/index.php5?title=%E8%BD%AE%E8%83%8EA_%E5%B0%8F%E8%BD%A6%E8%BD%AE%E8%83%8E Wheel] [IT_TIRE_A] [WH101102] | ||
| + | *10× [http://linksprite.com/wiki/index.php5?title=Jumper_Wires_Premium_-_Pack_of_40-_Male-to-Male_with_20cm Jumper Wires] [IT_JUMR_MM_PK40_WI20CM][BB101104] | ||
| + | *1 × [http://linksprite.com/wiki/index.php5?title=%E4%BA%9A%E5%85%8B%E5%8A%9B%E5%B0%8F%E8%BD%A6%E4%BA%91%E5%8F%B0%E6%9D%BF_Acrylic_Web_Cam_Plate&action=edit&redlink=1 Acrylic Web Cam Plate] [IT_ACRY_WEDCAMPL] [CA101106] | ||
| + | *1 × [http://linksprite.com/wiki/index.php5?title=%E7%94%B5%E6%B1%A0%E7%9B%92_6%E8%8A%825%E5%8F%B7%E7%94%B5%E6%B1%A0%E7%9B%92_Battery_Packs Battery Case] [IT_BYPS_6_5][WH104101] | ||
| + | *16× [http://linksprite.com/wiki/index.php5?title=螺丝长6MM Screw 3mm*6] [IT_SCREW_6MM] [WB101102] | ||
| + | *16× [http://linksprite.com/wiki/index.php5?title=%E8%9E%BA%E4%B8%9D%E9%95%BF12MM Screw 3mm*12] [IT_SCREW_12MM] [WB101103] | ||
| + | *4 × [http://linksprite.com/wiki/index.php5?title=%E8%9E%BA%E4%B8%9D%E9%95%BF25MM Screw 3mm*25] [IT_SCREW_25MM] [WB101104] | ||
| + | *1 × [http://store.cutedigi.com/ball-caster-metal/ Ball Caster Metal] [BOT_PT_OMNIDMETAL][104201008] | ||
| + | *8 × [http://linksprite.com/wiki/index.php5?title=中空六角铜柱6MM Copper Pillar] [IT_COPPCYL_6MM] [WA101102] | ||
| + | *24× [http://linksprite.com/wiki/index.php5?title=3M螺母 M3 Nut] [IT_NUT_3M][WB101101] | ||
| + | |||
| + | == Explanation of Acrylic Top Plate == | ||
| + | |||
| + | [[File:explanation of top.jpg]] | ||
| + | |||
| + | == Assembly Instructions == | ||
| + | |||
| + | *Solder Jumper Wires on both DC Motors. Use 4 M3*25 screws to fix the DC motors on Acrylic Bottom Plate, note that the bump of DC motors should be aimed to the holes on Acrylic Bottom Plate. | ||
| + | |||
| + | [[File:Acrylic robot platform1.jpg]] | ||
| + | |||
| + | |||
| + | *Use 2 M3*12 screws to fix Ball Caster Metal on Acrylic Bottom Plate. | ||
| + | |||
| + | [[File:Acrylic robot platform2.jpg]] | ||
| + | |||
| + | |||
| + | *Use 2 M3*12 screws to fix Batter Case on Acrylic Bottom Plate. | ||
| + | |||
| + | [[File:Acrylic robot platform3.jpg]] | ||
| + | |||
| + | [[File:Acrylic robot platform4.jpg]] | ||
| + | |||
| + | |||
| + | *Use 2 M3*12 screws to fix Acrylic Connecting Plate(6 holes) on the left side(from top view, the battery case is at bottom) of Acrylic Bottom Plate, use another 2 M3*12 screws to fix Acrylic Connecting Plate(5 holes) on the other side. | ||
| − | [[File:Acrylic | + | [[File:Acrylic robot platform5.jpg]] |
| − | * | + | *Install two wheels. |
| − | |||
| − | |||
| − | [[File:Acrylic | + | [[File:Acrylic robot platform6.jpg]] |
| − | * | + | *Use 4 M3*12 screws to fix Acrylic Top Plate on Acrylic Bottom Plate. |
| − | * | ||
| − | |||
| − | |||
| − | |||
| − | |||
| − | |||
| − | |||
| − | |||
| − | [[File:Acrylic | + | [[File:Acrylic robot platform7.jpg]] |
Latest revision as of 06:53, 2 September 2014
Contents
Introduction
Features
Dimensions: 182×202×82mm
Net weight: 412g
Package List
- 1 × Acrylic Top Plate [IT_KIT_ACRYTOPPL]] [CA101102]
- 1 × Acrylic Bottom Plate [IT_KIT_ACRYBOTTPL] [CA101103]
- 1 × Acrylic Connecting Plate(5 holes) [IT_KIT_ACRY CONNPL5HO][CA101104]
- 1 × Acrylic Connecting Plate(6 holes) [IT_KIT_ACRY CONNPL6HO][CA101105]
- 2 × Motor [IT_MOTOR_DC3V_6V] [WH103101]
- 2 × Wheel [IT_TIRE_A] [WH101102]
- 10× Jumper Wires [IT_JUMR_MM_PK40_WI20CM][BB101104]
- 1 × Acrylic Web Cam Plate [IT_ACRY_WEDCAMPL] [CA101106]
- 1 × Battery Case [IT_BYPS_6_5][WH104101]
- 16× Screw 3mm*6 [IT_SCREW_6MM] [WB101102]
- 16× Screw 3mm*12 [IT_SCREW_12MM] [WB101103]
- 4 × Screw 3mm*25 [IT_SCREW_25MM] [WB101104]
- 1 × Ball Caster Metal [BOT_PT_OMNIDMETAL][104201008]
- 8 × Copper Pillar [IT_COPPCYL_6MM] [WA101102]
- 24× M3 Nut [IT_NUT_3M][WB101101]
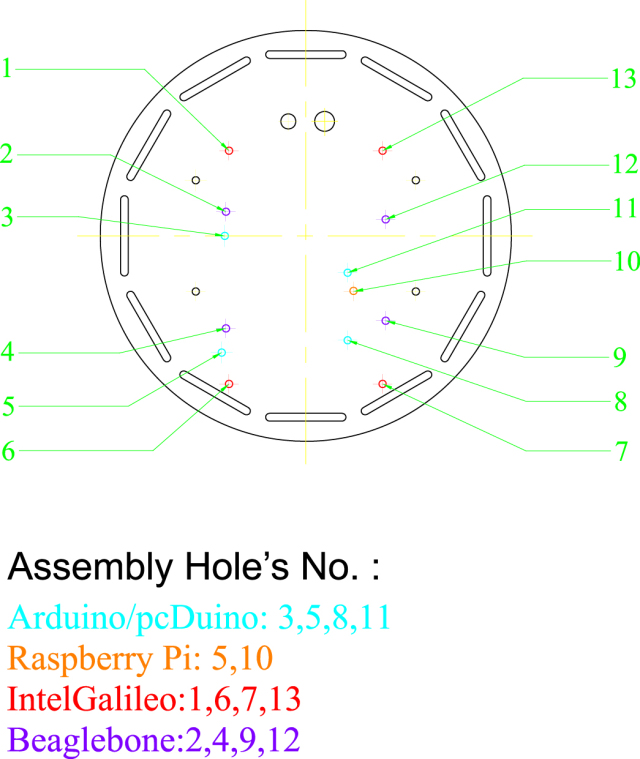
Explanation of Acrylic Top Plate
Assembly Instructions
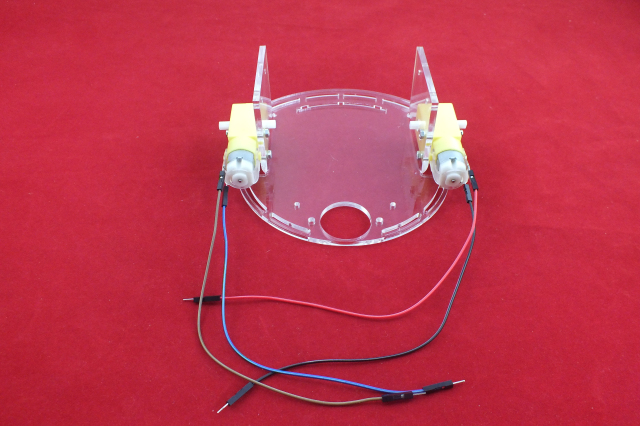
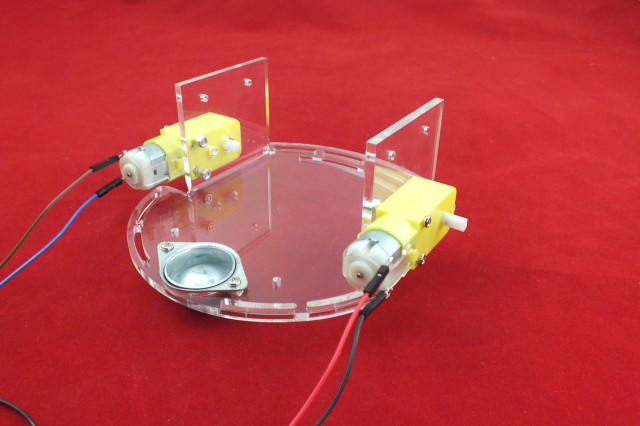
- Solder Jumper Wires on both DC Motors. Use 4 M3*25 screws to fix the DC motors on Acrylic Bottom Plate, note that the bump of DC motors should be aimed to the holes on Acrylic Bottom Plate.
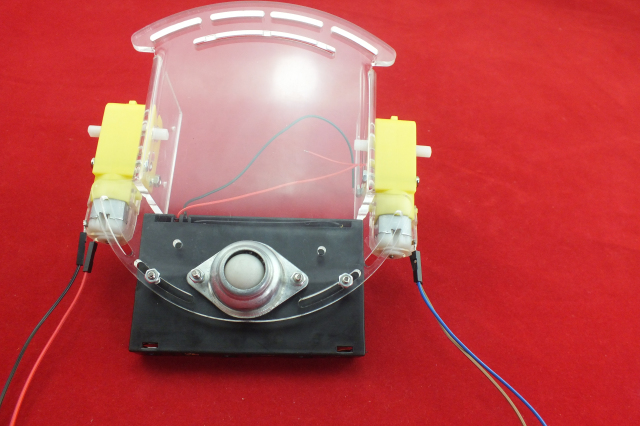
- Use 2 M3*12 screws to fix Ball Caster Metal on Acrylic Bottom Plate.
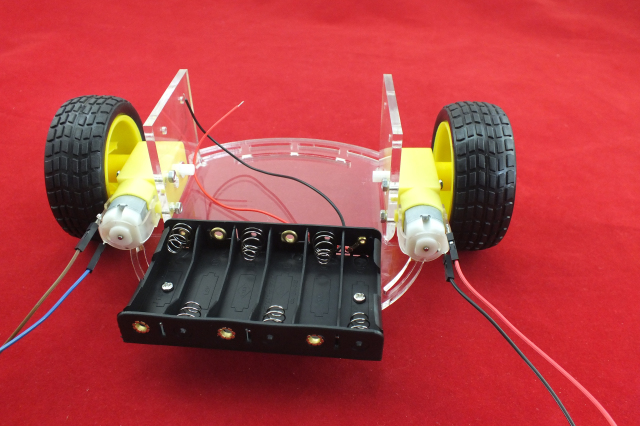
- Use 2 M3*12 screws to fix Batter Case on Acrylic Bottom Plate.
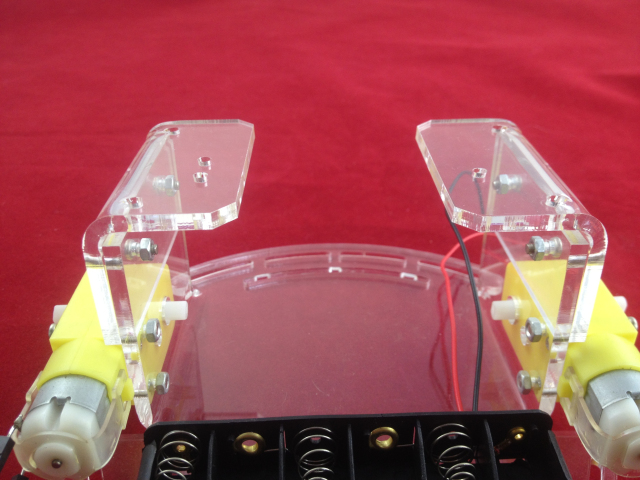
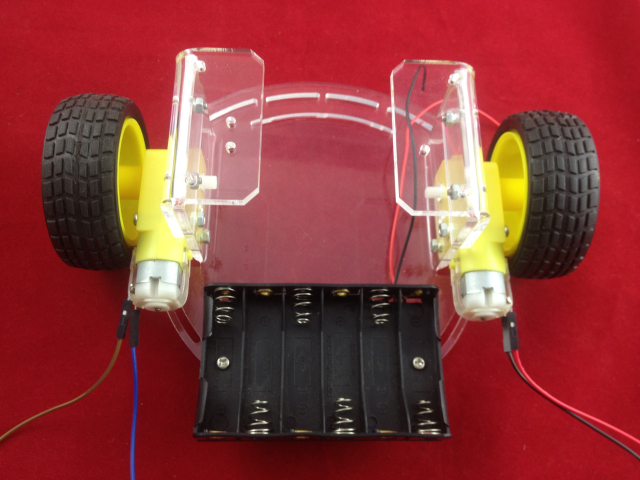
- Use 2 M3*12 screws to fix Acrylic Connecting Plate(6 holes) on the left side(from top view, the battery case is at bottom) of Acrylic Bottom Plate, use another 2 M3*12 screws to fix Acrylic Connecting Plate(5 holes) on the other side.
- Install two wheels.
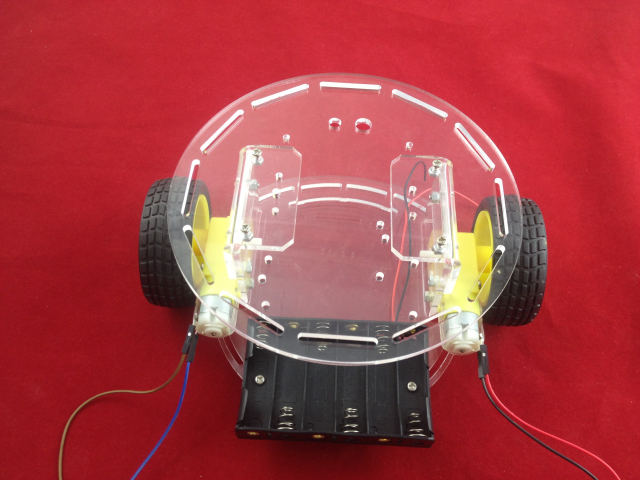
- Use 4 M3*12 screws to fix Acrylic Top Plate on Acrylic Bottom Plate.
