Difference between revisions of "Buzzer"
Katherine.d (talk | contribs) (→Connection Diagram) |
Katherine.d (talk | contribs) (→Sample Code) |
||
| Line 18: | Line 18: | ||
==Sample Code== | ==Sample Code== | ||
| − | < | + | <syntaxhighlight lang="c"> |
//For Arduino Start kit | //For Arduino Start kit | ||
//Compatible with all Arduino version | //Compatible with all Arduino version | ||
| Line 51: | Line 51: | ||
} | } | ||
} | } | ||
| − | </ | + | </syntaxhighlight> |
Revision as of 03:21, 5 December 2012
Introduction
<videoflash>lvwsq97EfQo</videoflash>
Part List
- DFRduio Duemilanove or Compatible Arduino Controller (1 unit)
- Buzzer (1 unit)
- Prototyping Shield (1 unit)
- Mini Breadboard (1 unit)
- Jumper Cables (2 units)
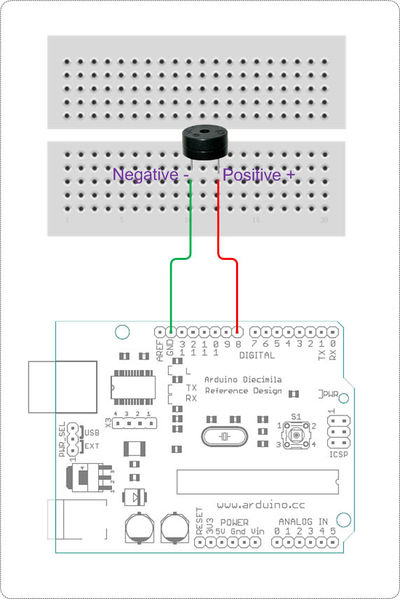
Connection Diagram
Sample Code
<syntaxhighlight lang="c"> //For Arduino Start kit //Compatible with all Arduino version //Last updated 2011-1-13 //www.dfrobot.com
int buzzer=8;//Connect the buzz positive Pin to Digital Pin 8
void setup()
{
pinMode(buzzer,OUTPUT);//Set Pin Mode as output
} void loop() {
 unsigned char i,j;
 while(1)
 {
   for(i=0;i<80;i++) //Sound effect 1
   {
     digitalWrite(buzzer,HIGH);//Make some sound
     delay(1);//Delay 1ms
     digitalWrite(buzzer,LOW);//Be quiet
     delay(1);//Delay 1ms
   }
   for(i=0;i<100;i++) //Sound effect 2
   {
     digitalWrite(buzzer,HIGH);//Make some sound
     delay(2);//Delay 2ms
     digitalWrite(buzzer,LOW);//Be quiet
     delay(2);//Delay 2ms
   }
 }
} </syntaxhighlight>
