Difference between revisions of "Strawberry Basic"
Katherine.d (talk | contribs) (→How to Upgrade) |
Katherine.d (talk | contribs) |
||
| (3 intermediate revisions by the same user not shown) | |||
| Line 82: | Line 82: | ||
=== Steps to burn the firmware to mini-SD card === | === Steps to burn the firmware to mini-SD card === | ||
| − | Another tool called “PhoenixCard” is provided to do this job. This tool makes the process to burn the firmware to SD card very easy. Please see the document under the software dir for more details. | + | Another tool called “PhoenixCard” is provided to do this job. This tool makes the process to burn the firmware to SD card very easy. |
| + | |||
| + | Please see the document under the software dir for more details. | ||
| + | |||
| + | == Arduino Interface == | ||
| + | |||
| + | === PWM === | ||
| + | |||
| + | There are 2 hardware PWM interface and 4 simulation PWM (simulated by GPIO). The simulation PWM are not suggest. | ||
| + | |||
| + | PWM0 and PWM1 are hardware PWM and can support MHz wave, PWM2~PWM5 can support <100 Hz wave and may not very accurate. | ||
| + | |||
| + | [[File:pwminterface.jpg | 400px]] | ||
| + | |||
| + | === GPIO === | ||
| + | |||
| + | There are 14 GPIOs. Sometimes, some GPIO will be mux as other PIN, such as SPI or external interrupt. | ||
| + | |||
| + | [[File:GPIOinterface.jpg | 400px]] | ||
| + | |||
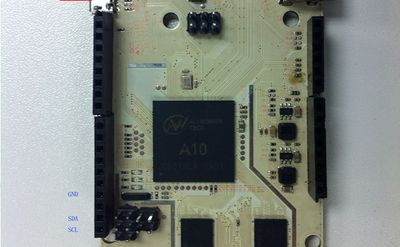
| + | === IIC(Two wire) === | ||
| + | |||
| + | [[File:iicinterface.jpg | 400px]] | ||
| + | |||
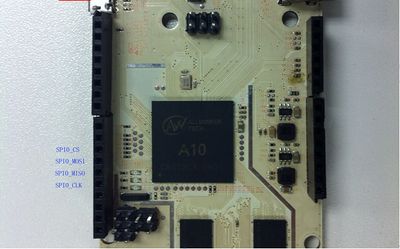
| + | === SPI === | ||
| + | |||
| + | [[File:spiinterface.jpg | 400px]] | ||
| + | |||
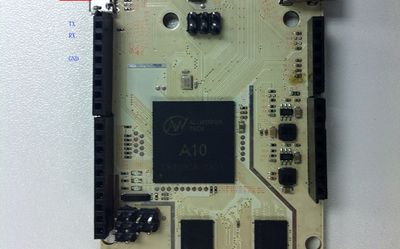
| + | === UART === | ||
| + | |||
| + | [[File:uartinterface.jpg | 400px]] | ||
| + | |||
| + | === External interrupt === | ||
| + | |||
| + | === ADC === | ||
| + | |||
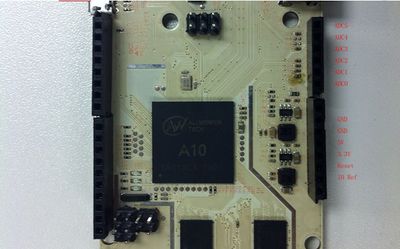
| + | There are 2 6bits ADC and 4 12bits ADC. | ||
| + | |||
| + | ADC0 and ADC1 are 6 bits, others are 12 bits. | ||
| + | |||
| + | [[File:adcinterface.jpg | 400px]] | ||
| + | |||
| + | == Ubuntu == | ||
| + | |||
| + | There is a light Ubuntu OS embedded. You can operate the device with the USB mouse and keyboard. The support application inlcudes: | ||
| + | |||
| + | :*Terminal | ||
| + | :*File browser | ||
| + | :*Internet browser | ||
| + | :*Office viewer and editor | ||
| + | :*Movie Player | ||
| + | |||
| + | So far, there is only 256M DDR inside, so you can't open some big website with the browser, or you can't open the big documentation with the office editor. If you want the better experience, you can hold one Arduino Pro version with 1G DDR inside. | ||
| + | |||
| + | Arduino Basic has no Wifi network inside. You can get one Wifi accessory from the Arduino site. | ||
| + | |||
| + | '''''[Wifi accessories is under construct, will add the support list, such as RTL8188/8192]''''' | ||
| + | |||
| + | == Arduino Library == | ||
| + | |||
| + | '''[Under construct, we will provide the header files, library files, sample code, SDK documents and toolchains. ]''' | ||
| + | |||
| + | Please access arduino.cc to get the Arduino library, then you can compile and run some interest sample on the board. | ||
| + | |||
| + | Arduino Basic has follow libraries: | ||
| + | |||
| + | *> Digital I/O, 14 shared digital I/Os | ||
| + | *> Analog I/O, 6 ADC and 6 PWM | ||
| + | *> External interrupts | ||
| + | *> Serial (UART) | ||
| + | *> TWI (IIC) | ||
| + | *> SPI | ||
Latest revision as of 08:29, 19 December 2012
Contents
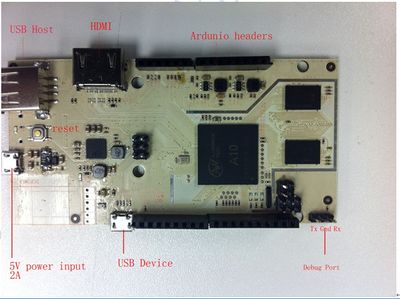
Overview
| Items | Basic |
|---|---|
| CPU | AllWinner A10 SoC, 1GHz ARM Cortex A8 |
| GPU | OpenGL ES2.0, OpenVG 1.1 Mali 400 core |
| DRAM | 256MB |
| Onboard Storage | 2GB NAND |
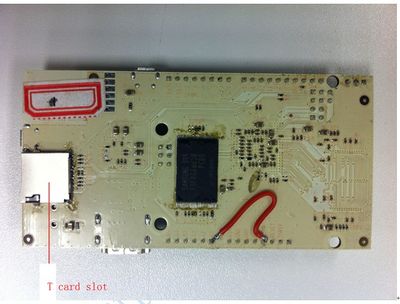
| External Storage | T Card Slot (support up to 32GB) |
| Video Output | HDMI |
| OS | Linux3.0 + Ubuntu12.10 |
| Extension Interface | Arduino Headers |
| Network interface | USB WiFi extension (not included) |
| Power In | 5V 2A |
[ will re-generate the demo picture after PVT]
[ will re-generate the demo picture after PVT]
How to Upgrade
The board support to boot from mini-SD card or NAND flash.
Steps to burn the firmware to NAND flash
A PC tool called “Livesuit” is provided to burn the firmware from PC to the flash on board.
Livesuite requires a min-USB cable connect the PC to the USB OTG port on board.
Note: For the first time run livesuite, you need to install usb driver under livesuite dir. If the nand flash already have firmware, you need to connect your PC to the board via UART cable.
And set the baund rate to 115200, press keyboard “2” before power on to enter the force-update process.
See Livesuite manual(under livesuite software dir) for more details about livesuite.
STEPS
- 1 open the LiveSuit software.
- 2 select the firmware. (*.img)
- 3 insert the device to be upgraded (only one device is permitted)
- 4 click “ Update”, to start.
- 5 During upgrade, you will be asked to install the USB Driver twice. The driver file is “usbdrv.inf” in the folder “usbDriver”,which is located at the installation path of “LiveSuit”(for more detail information please refer the to “Appendix:USB Device Install”)
- 6 If you upgrade successfully, please pull out the device, then reset it.
- 7 if failed, please pull out the device, reset it. And do the upgrade again.
- 8 if upgrade failed so many times, please contact with the franchiser.
Note
Although the tools are useful and easy to use, but sometimes it takes very long time to burn a big image ,For example, livesuite takes more than one hour to burn a 1.5GBytes image.
So we provide another choice, we burn a small image (about 20MB) with livesuite, and after system bootup, it will continue to burn the firmware via usb disk. For this method, it takes only about 10 minutes to do the same job.
Steps to burn the firmware to mini-SD card
Another tool called “PhoenixCard” is provided to do this job. This tool makes the process to burn the firmware to SD card very easy.
Please see the document under the software dir for more details.
Arduino Interface
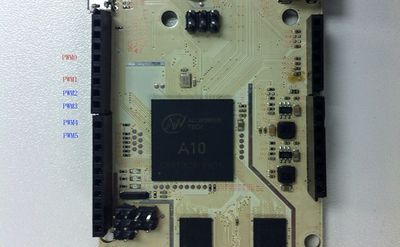
PWM
There are 2 hardware PWM interface and 4 simulation PWM (simulated by GPIO). The simulation PWM are not suggest.
PWM0 and PWM1 are hardware PWM and can support MHz wave, PWM2~PWM5 can support <100 Hz wave and may not very accurate.
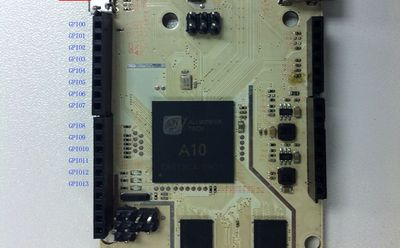
GPIO
There are 14 GPIOs. Sometimes, some GPIO will be mux as other PIN, such as SPI or external interrupt.
IIC(Two wire)
SPI
UART
External interrupt
ADC
There are 2 6bits ADC and 4 12bits ADC.
ADC0 and ADC1 are 6 bits, others are 12 bits.
Ubuntu
There is a light Ubuntu OS embedded. You can operate the device with the USB mouse and keyboard. The support application inlcudes:
- Terminal
- File browser
- Internet browser
- Office viewer and editor
- Movie Player
So far, there is only 256M DDR inside, so you can't open some big website with the browser, or you can't open the big documentation with the office editor. If you want the better experience, you can hold one Arduino Pro version with 1G DDR inside.
Arduino Basic has no Wifi network inside. You can get one Wifi accessory from the Arduino site.
[Wifi accessories is under construct, will add the support list, such as RTL8188/8192]
Arduino Library
[Under construct, we will provide the header files, library files, sample code, SDK documents and toolchains. ]
Please access arduino.cc to get the Arduino library, then you can compile and run some interest sample on the board.
Arduino Basic has follow libraries:
- > Digital I/O, 14 shared digital I/Os
- > Analog I/O, 6 ADC and 6 PWM
- > External interrupts
- > Serial (UART)
- > TWI (IIC)
- > SPI
