Difference between revisions of "LED Matrix Kit"
Katherine.d (talk | contribs) (→Connection Wires) |
(→Introduction) |
||
| (21 intermediate revisions by 2 users not shown) | |||
| Line 5: | Line 5: | ||
The 8x8 LED Matrix is easy to use and compatible with Arduino, and its LED brightness adjustment can be implemented in software. | The 8x8 LED Matrix is easy to use and compatible with Arduino, and its LED brightness adjustment can be implemented in software. | ||
| − | + | ||
| − | [[File:LED Matrix | + | 8x8 LED Matrix kit has many applications in real life, such as various types of electronic display panels. If the LED matrix is not driven by any peripherals, it’ll waste the interface of devices, and the LED brightness will be impaired due to insufficient power, so that we cannot get ideal display effect. |
| + | |||
| + | The LED matrix can be driven in two ways: parallel or serial. We usually drive it in the serial manner in order to save interface. The serial-driven LED matrix actually dynamically displays the LEDs, i.e., displays the LEDs row-by-row or column-by-column. The persistence of vision for humans is about 0.1s, so as long as we can serially display all 8 rows/columns within 0.1s, we’ll see a complete character or pattern. | ||
| + | |||
| + | [[File:LED Matrix 108101001.jpg| 640px]] | ||
| + | |||
| + | |||
This product comes in the form of a kit. It includes the following components: | This product comes in the form of a kit. It includes the following components: | ||
| Line 23: | Line 29: | ||
[[File:LED Matrix1.jpg | 400px]] | [[File:LED Matrix1.jpg | 400px]] | ||
| − | |||
==Specification of LED Matrix== | ==Specification of LED Matrix== | ||
| Line 41: | Line 46: | ||
'''DIMENSIONS''' | '''DIMENSIONS''' | ||
| − | [[File:Dimensions.jpg]] | + | [[File:Dimensions.jpg | 400px]] |
==Assembly Instruction== | ==Assembly Instruction== | ||
| Line 88: | Line 93: | ||
[[File:Assembled.jpg | 400px]] | [[File:Assembled.jpg | 400px]] | ||
| − | == | + | ==Usage== |
| + | |||
| + | ===Hardware=== | ||
| − | + | '''Hardware Preparation (Use Arduino as microcontroller)''' | |
*LED matrix module | *LED matrix module | ||
| Line 110: | Line 117: | ||
*Power supply 5V/2A. | *Power supply 5V/2A. | ||
| − | + | '''Connection Wires''' | |
The schematics of the LED matrix is attached below. | The schematics of the LED matrix is attached below. | ||
| Line 125: | Line 132: | ||
''Schematics of the 8x8 LED Matrix'' | ''Schematics of the 8x8 LED Matrix'' | ||
| + | |||
| + | '''Testing Steps''' | ||
| + | |||
| + | 1.Wiring Instructions | ||
| + | |||
| + | :*Connect Arduino pin8 to DIN on 8x8 LED Matrix | ||
| + | :*Connect Arduino pin9 to CS of 8x8 LED Matrix | ||
| + | :*Connect Arduino pin10 to CLK of 8x8 LED Matrix | ||
| + | :*Connect Arduino 5V to VCC of 8x8 LED Matrix | ||
| + | :*Connect Arduino GND to GND of 8x8 LED Matrix | ||
| + | ''Attention:8*8LED Matrix must be common-grounded with Arduino module.'' | ||
| + | |||
| + | [[File:LED Matrix00.jpg | 400px]] | ||
| + | |||
| + | 2.Check the corresponding interfaces are properly connected. | ||
| + | |||
| + | 3.Powering up the Arduino demo board with AC adapter. | ||
| + | |||
| + | 4.Observation:The LED matrix should circularly display the digits 0 to 9 on LED screen first, then the characters A to Z, as shown in the above figure. | ||
| + | |||
| + | ===Software=== | ||
| + | |||
| + | '''software preparation''' | ||
| + | |||
| + | The only necessary software is Arduino 1.0, as shown below. | ||
| + | |||
| + | [[File:Arduino.jpg]] | ||
| + | |||
| + | The timing diagram for Max7219 and its Serial-Data Format are attached below with its Electronic Characteristics. | ||
| + | |||
| + | |||
| + | [[File:software1.jpg | 400px]] | ||
| + | |||
| + | [[File:software2.jpg | 400px]] | ||
| + | |||
| + | '''Example code''' | ||
| + | |||
| + | <syntaxhighlight lang="c"> | ||
| + | |||
| + | unsigned char i; | ||
| + | unsigned char j; | ||
| + | /*Port Definitions*/ | ||
| + | int Max7219_pinCLK = 10; | ||
| + | int Max7219_pinCS = 9; | ||
| + | int Max7219_pinDIN = 8; | ||
| + | |||
| + | unsigned char disp1[38][8]={ | ||
| + | {0x3C,0x42,0x42,0x42,0x42,0x42,0x42,0x3C},//0 | ||
| + | {0x10,0x18,0x14,0x10,0x10,0x10,0x10,0x10},//1 | ||
| + | {0x7E,0x2,0x2,0x7E,0x40,0x40,0x40,0x7E},//2 | ||
| + | {0x3E,0x2,0x2,0x3E,0x2,0x2,0x3E,0x0},//3 | ||
| + | {0x8,0x18,0x28,0x48,0xFE,0x8,0x8,0x8},//4 | ||
| + | {0x3C,0x20,0x20,0x3C,0x4,0x4,0x3C,0x0},//5 | ||
| + | {0x3C,0x20,0x20,0x3C,0x24,0x24,0x3C,0x0},//6 | ||
| + | {0x3E,0x22,0x4,0x8,0x8,0x8,0x8,0x8},//7 | ||
| + | {0x0,0x3E,0x22,0x22,0x3E,0x22,0x22,0x3E},//8 | ||
| + | {0x3E,0x22,0x22,0x3E,0x2,0x2,0x2,0x3E},//9 | ||
| + | {0x8,0x14,0x22,0x3E,0x22,0x22,0x22,0x22},//A | ||
| + | {0x3C,0x22,0x22,0x3E,0x22,0x22,0x3C,0x0},//B | ||
| + | {0x3C,0x40,0x40,0x40,0x40,0x40,0x3C,0x0},//C | ||
| + | {0x7C,0x42,0x42,0x42,0x42,0x42,0x7C,0x0},//D | ||
| + | {0x7C,0x40,0x40,0x7C,0x40,0x40,0x40,0x7C},//E | ||
| + | {0x7C,0x40,0x40,0x7C,0x40,0x40,0x40,0x40},//F | ||
| + | {0x3C,0x40,0x40,0x40,0x40,0x44,0x44,0x3C},//G | ||
| + | {0x44,0x44,0x44,0x7C,0x44,0x44,0x44,0x44},//H | ||
| + | {0x7C,0x10,0x10,0x10,0x10,0x10,0x10,0x7C},//I | ||
| + | {0x3C,0x8,0x8,0x8,0x8,0x8,0x48,0x30},//J | ||
| + | {0x0,0x24,0x28,0x30,0x20,0x30,0x28,0x24},//K | ||
| + | {0x40,0x40,0x40,0x40,0x40,0x40,0x40,0x7C},//L | ||
| + | {0x81,0xC3,0xA5,0x99,0x81,0x81,0x81,0x81},//M | ||
| + | {0x0,0x42,0x62,0x52,0x4A,0x46,0x42,0x0},//N | ||
| + | {0x3C,0x42,0x42,0x42,0x42,0x42,0x42,0x3C},//O | ||
| + | {0x3C,0x22,0x22,0x22,0x3C,0x20,0x20,0x20},//P | ||
| + | {0x1C,0x22,0x22,0x22,0x22,0x26,0x22,0x1D},//Q | ||
| + | {0x3C,0x22,0x22,0x22,0x3C,0x24,0x22,0x21},//R | ||
| + | {0x0,0x1E,0x20,0x20,0x3E,0x2,0x2,0x3C},//S | ||
| + | {0x0,0x3E,0x8,0x8,0x8,0x8,0x8,0x8},//T | ||
| + | {0x42,0x42,0x42,0x42,0x42,0x42,0x22,0x1C},//U | ||
| + | {0x42,0x42,0x42,0x42,0x42,0x42,0x24,0x18},//V | ||
| + | {0x0,0x49,0x49,0x49,0x49,0x2A,0x1C,0x0},//W | ||
| + | {0x0,0x41,0x22,0x14,0x8,0x14,0x22,0x41},//X | ||
| + | {0x41,0x22,0x14,0x8,0x8,0x8,0x8,0x8},//Y | ||
| + | {0x0,0x7F,0x2,0x4,0x8,0x10,0x20,0x7F},//Z | ||
| + | }; | ||
| + | |||
| + | |||
| + | |||
| + | void Write_Max7219_byte(unsigned char DATA) | ||
| + | { | ||
| + | unsigned char i; | ||
| + | digitalWrite(Max7219_pinCS,LOW); | ||
| + | for(i=8;i>=1;i--) | ||
| + | { | ||
| + | digitalWrite(Max7219_pinCLK,LOW); | ||
| + | digitalWrite(Max7219_pinDIN,DATA&0x80);// Extracting a bit data | ||
| + | DATA = DATA<<1; | ||
| + | digitalWrite(Max7219_pinCLK,HIGH); | ||
| + | } | ||
| + | } | ||
| + | |||
| + | |||
| + | void Write_Max7219(unsigned char address,unsigned char dat) | ||
| + | { | ||
| + | digitalWrite(Max7219_pinCS,LOW); | ||
| + | Write_Max7219_byte(address); //address,code of LED | ||
| + | Write_Max7219_byte(dat); //data,figure on LED | ||
| + | digitalWrite(Max7219_pinCS,HIGH); | ||
| + | } | ||
| + | |||
| + | void Init_MAX7219(void) | ||
| + | { | ||
| + | Write_Max7219(0x09, 0x00); //decoding :BCD | ||
| + | Write_Max7219(0x0a, 0x03); //brightness | ||
| + | Write_Max7219(0x0b, 0x07); //scanlimit;8 LEDs | ||
| + | Write_Max7219(0x0c, 0x01); //power-down mode:0,normal mode:1 | ||
| + | Write_Max7219(0x0f, 0x00); //test display:1;EOT,display:0 | ||
| + | } | ||
| + | |||
| + | |||
| + | |||
| + | void setup() | ||
| + | { | ||
| + | |||
| + | pinMode(Max7219_pinCLK,OUTPUT); | ||
| + | pinMode(Max7219_pinCS,OUTPUT); | ||
| + | pinMode(Max7219_pinDIN,OUTPUT); | ||
| + | delay(50); | ||
| + | Init_MAX7219(); | ||
| + | } | ||
| + | |||
| + | |||
| + | void loop() | ||
| + | { | ||
| + | for(j=0;j<38;j++) | ||
| + | { | ||
| + | for(i=1;i<9;i++) | ||
| + | Write_Max7219(i,disp1[j][i-1]); | ||
| + | delay(500); | ||
| + | } | ||
| + | } | ||
| + | </syntaxhighlight> | ||
| + | |||
| + | ==Demo== | ||
| + | |||
| + | '''1.Open Arduino development environment.''' | ||
| + | |||
| + | [[File:Arduino2.jpg | 400px]] | ||
| + | |||
| + | '''2.Copy the source code we provide into Arduino compiler, and compile them.''' | ||
| + | |||
| + | [[File:Arduino3.jpg | 400px]] | ||
| + | |||
| + | '''3.Select proper serial port and board.''' | ||
| + | |||
| + | [[File:Arduino4.jpg | 400px]] | ||
| + | |||
| + | [[File:Arduino5.jpg | 400px]] | ||
| + | |||
| + | '''4.Connect pins according to the schematics, and download codes into Arduino board. You’ll see the LED matrix circularly display the digits 0-9 and the characters A-Z.''' | ||
| + | |||
| + | [[File:LED Matrix2.jpg | 400px]] | ||
| + | |||
| + | [[File:LED Matrix3.jpg | 400px]] | ||
| + | |||
| + | == pcDuino Sample Code == | ||
| + | |||
| + | |||
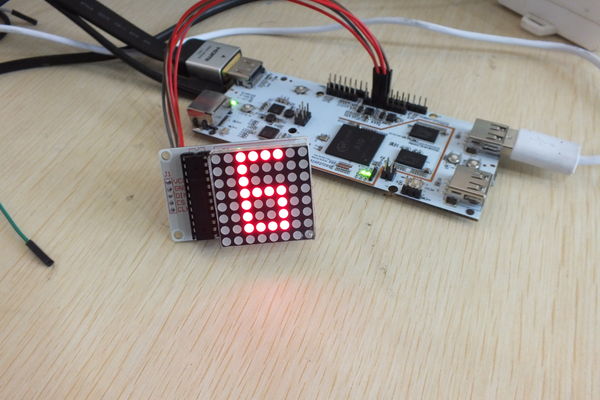
| + | [[File:DSCF1731.JPG | 600px]] | ||
| + | |||
| + | <syntaxhighlight lang="c"> | ||
| + | |||
| + | #include "core.h" | ||
| + | unsigned char i; | ||
| + | unsigned char j; | ||
| + | int Max7219_pinCLK = 8; | ||
| + | int Max7219_pinCS = 9; | ||
| + | int Max7219_pinDIN = 10; | ||
| + | |||
| + | unsigned char disp1[38][8] = | ||
| + | { | ||
| + | {0x3C,0x42,0x42,0x42,0x42,0x42,0x42,0x3C},//0 | ||
| + | {0x10,0x30,0x50,0x10,0x10,0x10,0x10,0x10},//1 | ||
| + | {0x7E,0x2,0x2,0x7E,0x40,0x40,0x40,0x7E},//2 | ||
| + | {0x3E,0x2,0x2,0x3E,0x2,0x2,0x3E,0x0},//3 | ||
| + | {0x8,0x18,0x28,0x48,0xFE,0x8,0x8,0x8},//4 | ||
| + | {0x3C,0x20,0x20,0x3C,0x4,0x4,0x3C,0x0},//5 | ||
| + | {0x3C,0x20,0x20,0x3C,0x24,0x24,0x3C,0x0},//6 | ||
| + | {0x3E,0x22,0x4,0x8,0x8,0x8,0x8,0x8},//7 | ||
| + | {0x0,0x3E,0x22,0x22,0x3E,0x22,0x22,0x3E},//8 | ||
| + | {0x3E,0x22,0x22,0x3E,0x2,0x2,0x2,0x3E},//9 | ||
| + | {0x8,0x14,0x22,0x3E,0x22,0x22,0x22,0x22},//A | ||
| + | {0x3C,0x22,0x22,0x3E,0x22,0x22,0x3C,0x0},//B | ||
| + | {0x3C,0x40,0x40,0x40,0x40,0x40,0x3C,0x0},//C | ||
| + | {0x7C,0x42,0x42,0x42,0x42,0x42,0x7C,0x0},//D | ||
| + | {0x7C,0x40,0x40,0x7C,0x40,0x40,0x40,0x7C},//E | ||
| + | {0x7C,0x40,0x40,0x7C,0x40,0x40,0x40,0x40},//F | ||
| + | {0x3C,0x40,0x40,0x40,0x40,0x44,0x44,0x3C},//G | ||
| + | {0x44,0x44,0x44,0x7C,0x44,0x44,0x44,0x44},//H | ||
| + | {0x7C,0x10,0x10,0x10,0x10,0x10,0x10,0x7C},//I | ||
| + | {0x3C,0x8,0x8,0x8,0x8,0x8,0x48,0x30},//J | ||
| + | {0x0,0x24,0x28,0x30,0x20,0x30,0x28,0x24},//K | ||
| + | {0x40,0x40,0x40,0x40,0x40,0x40,0x40,0x7C},//L | ||
| + | {0x81,0xC3,0xA5,0x99,0x81,0x81,0x81,0x81},//M | ||
| + | {0x0,0x42,0x62,0x52,0x4A,0x46,0x42,0x0},//N | ||
| + | {0x3C,0x42,0x42,0x42,0x42,0x42,0x42,0x3C},//O | ||
| + | {0x3C,0x22,0x22,0x22,0x3C,0x20,0x20,0x20},//P | ||
| + | {0x1C,0x22,0x22,0x22,0x22,0x26,0x22,0x1D},//Q | ||
| + | {0x3C,0x22,0x22,0x22,0x3C,0x24,0x22,0x21},//R | ||
| + | {0x0,0x1E,0x20,0x20,0x3E,0x2,0x2,0x3C},//S | ||
| + | {0x0,0x3E,0x8,0x8,0x8,0x8,0x8,0x8},//T | ||
| + | {0x42,0x42,0x42,0x42,0x42,0x42,0x22,0x1C},//U | ||
| + | {0x42,0x42,0x42,0x42,0x42,0x42,0x24,0x18},//V | ||
| + | {0x0,0x49,0x49,0x49,0x49,0x2A,0x1C,0x0},//W | ||
| + | {0x0,0x41,0x22,0x14,0x8,0x14,0x22,0x41},//X | ||
| + | {0x41,0x22,0x14,0x8,0x8,0x8,0x8,0x8},//Y | ||
| + | {0x0,0x7F,0x2,0x4,0x8,0x10,0x20,0x7F},//Z | ||
| + | {0x8,0x7F,0x49,0x49,0x7F,0x8,0x8,0x8},// {0xFE,0xBA,0x92,0xBA,0x92,0x9A,0xBA,0xFE},//}; | ||
| + | |||
| + | void Write_Max7219_byte(unsigned char DATA) | ||
| + | { | ||
| + | unsigned char i; | ||
| + | digitalWrite(Max7219_pinCS,LOW); | ||
| + | for(i=8;i>=1;i--) | ||
| + | { | ||
| + | digitalWrite(Max7219_pinCLK,LOW); | ||
| + | if((DATA&0x80)==0x80) digitalWrite(Max7219_pinDIN,HIGH); | ||
| + | else digitalWrite(Max7219_pinDIN,LOW); | ||
| + | DATA = DATA<<1; | ||
| + | digitalWrite(Max7219_pinCLK,HIGH); | ||
| + | } | ||
| + | } | ||
| + | |||
| + | void Write_Max7219(unsigned char address,unsigned char dat) | ||
| + | { | ||
| + | digitalWrite(Max7219_pinCS,LOW); | ||
| + | Write_Max7219_byte(address); | ||
| + | Write_Max7219_byte(dat); | ||
| + | digitalWrite(Max7219_pinCS,HIGH); | ||
| + | } | ||
| + | |||
| + | void Init_MAX7219(void) | ||
| + | { | ||
| + | Write_Max7219(0x09, 0x00); | ||
| + | Write_Max7219(0x0a, 0x03); | ||
| + | Write_Max7219(0x0b, 0x07); | ||
| + | Write_Max7219(0x0c, 0x01); | ||
| + | Write_Max7219(0x0f, 0x00); | ||
| + | } | ||
| + | |||
| + | void setup() | ||
| + | { | ||
| + | pinMode(11,OUTPUT); | ||
| + | pinMode(12,OUTPUT); | ||
| + | digitalWrite(11,LOW); | ||
| + | digitalWrite(12,HIGH); | ||
| + | pinMode(Max7219_pinCLK,OUTPUT); | ||
| + | pinMode(Max7219_pinCS,OUTPUT); | ||
| + | pinMode(Max7219_pinDIN,OUTPUT); | ||
| + | delay(50); | ||
| + | Init_MAX7219(); | ||
| + | } | ||
| + | |||
| + | void loop() | ||
| + | { | ||
| + | for(j=0;j<38;j++) | ||
| + | { | ||
| + | for(i=1;i<9;i++) | ||
| + | Write_Max7219(i,disp1[j][i-1]); | ||
| + | delay(500); | ||
| + | } | ||
| + | } | ||
| + | |||
| + | </syntaxhighlight> | ||
| + | |||
| + | ==Resources== | ||
| + | *[https://s3.amazonaws.com/linksprite/Arduino_kits/LEDmatrixkit/LED_Martix_Kit_User_Guide_V2.pdf User Guide] | ||
Latest revision as of 07:46, 1 July 2016
Contents
Introduction
This product is a serially driven 8x8 LED Matrix kit powered by MAX7219.
It only needs three data lines and two power lines.
The 8x8 LED Matrix is easy to use and compatible with Arduino, and its LED brightness adjustment can be implemented in software.
8x8 LED Matrix kit has many applications in real life, such as various types of electronic display panels. If the LED matrix is not driven by any peripherals, it’ll waste the interface of devices, and the LED brightness will be impaired due to insufficient power, so that we cannot get ideal display effect.
The LED matrix can be driven in two ways: parallel or serial. We usually drive it in the serial manner in order to save interface. The serial-driven LED matrix actually dynamically displays the LEDs, i.e., displays the LEDs row-by-row or column-by-column. The persistence of vision for humans is about 0.1s, so as long as we can serially display all 8 rows/columns within 0.1s, we’ll see a complete character or pattern.
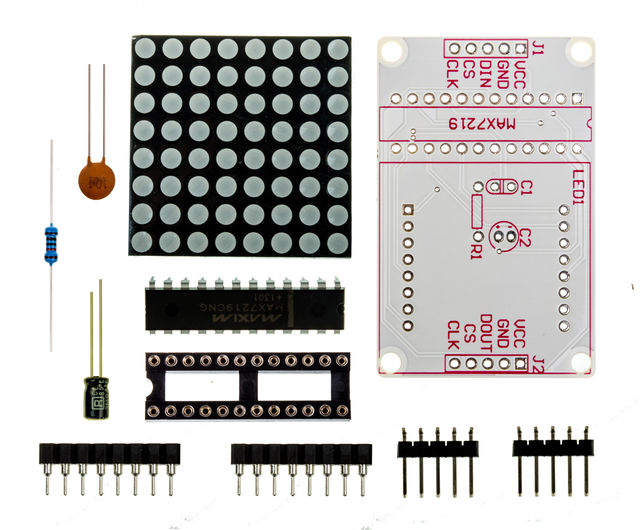
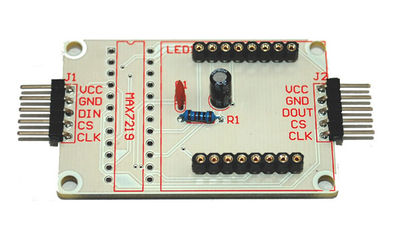
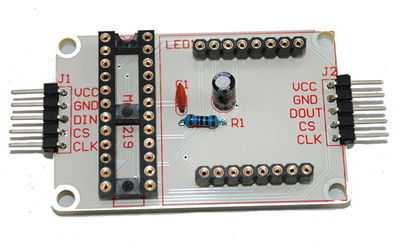
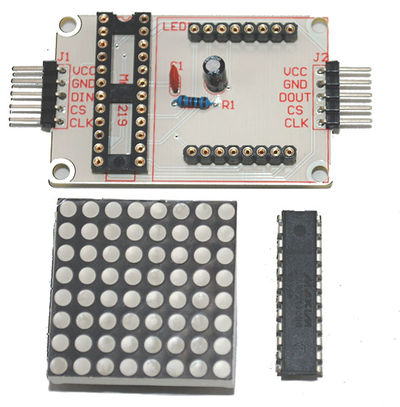
This product comes in the form of a kit. It includes the following components:
- MAX7219
- Electrolytic cpaacitor:10uF/25V
- Resistor:10K
- Capacitance:0.1uF
- Headers and receptacles.
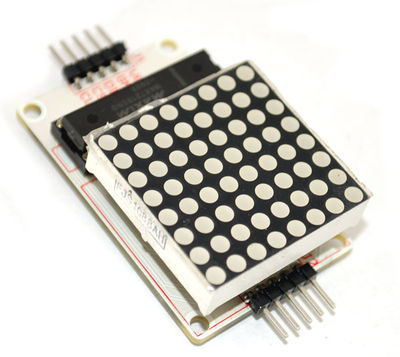
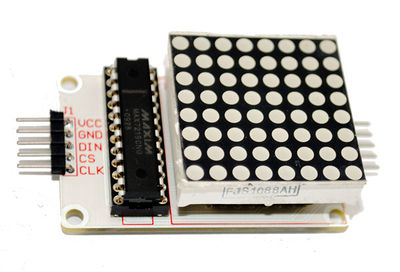
After assembling, it will look as:
Specification of LED Matrix
- Operating Voltage: DC 4.7V – 5.3V
- Typical Voltage: 5V
- Operating Current: 320mA
- Max Operating Current: 2A
- Operating Temperature: 0 ℃ – 50 ℃
- Typical Temperature: 25 ℃
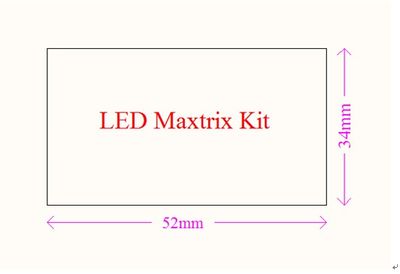
DIMENSIONS
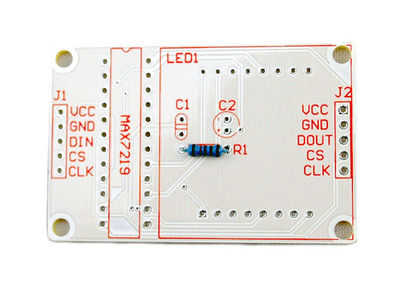
Assembly Instruction
Step 1
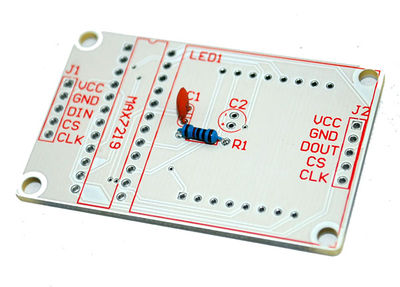
- Install resistor R1.
Step 2
- Install capacitor C1.
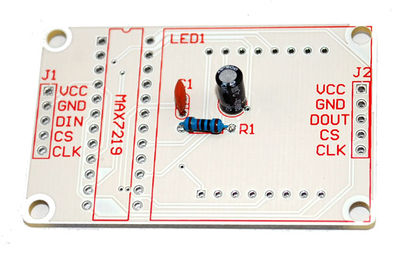
Step 3
- Install capacitor C2.
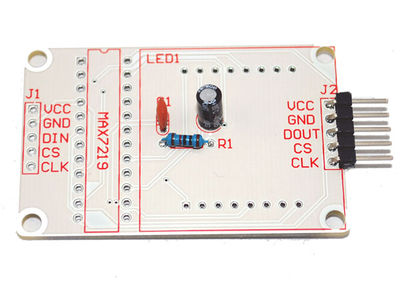
Step 4
- Install header J2.
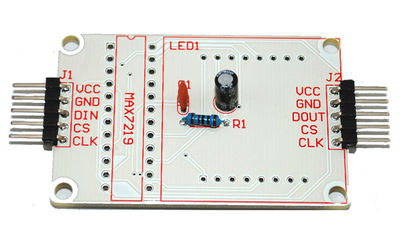
Step 5
- Install header J1.
Step 6
- Install LED matrix receptacle.
Step 7
- Install LED MAX7219 receptacle.
Step 8
- Lay down C2, and install the MAX7219 and LED matrix to their receptacles.
Finally, we get the finished LED matrix module:
Usage
Hardware
Hardware Preparation (Use Arduino as microcontroller)
- LED matrix module
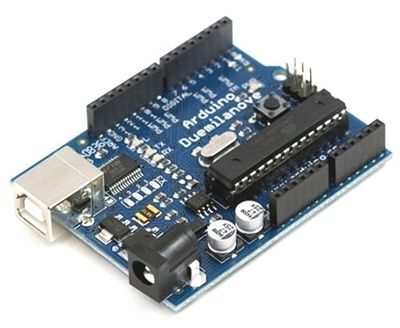
- Arduino
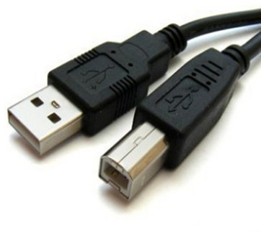
- USB Cable
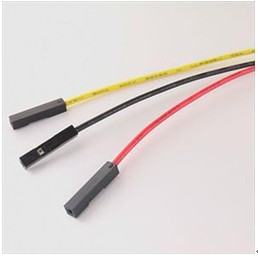
- Jumper Wires
- Power supply 5V/2A.
Connection Wires
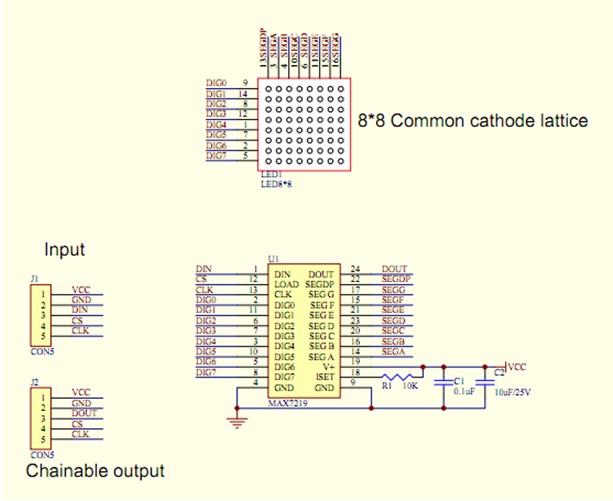
The schematics of the LED matrix is attached below.
Please follow the following instructions to connect hardwares.
- The 8x8 LED Matrix must be common-grounded with the Arduino module;
- Connect Arduino pin 8 to DIN on the LED Matrix;
- Connect Arduino pin 9 to CS on the LED Matrix;
- Connect Arduino pin 10 to CLK on the LED Matrix;
- Use independent power supply for the 8x8 LED Matrix Shield, and the supply voltage is 5V/2A.
Schematics of the 8x8 LED Matrix
Testing Steps
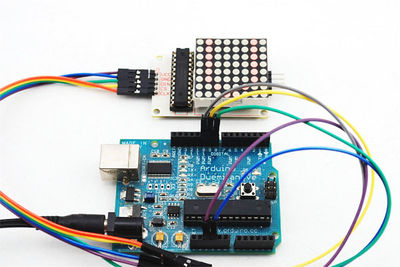
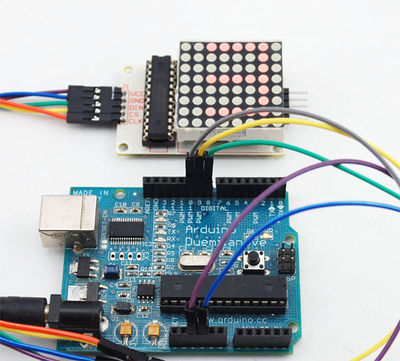
1.Wiring Instructions
- Connect Arduino pin8 to DIN on 8x8 LED Matrix
- Connect Arduino pin9 to CS of 8x8 LED Matrix
- Connect Arduino pin10 to CLK of 8x8 LED Matrix
- Connect Arduino 5V to VCC of 8x8 LED Matrix
- Connect Arduino GND to GND of 8x8 LED Matrix
Attention:8*8LED Matrix must be common-grounded with Arduino module.
2.Check the corresponding interfaces are properly connected.
3.Powering up the Arduino demo board with AC adapter.
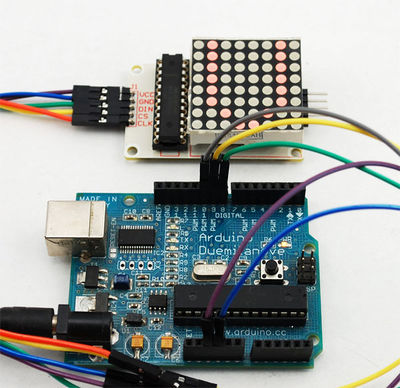
4.Observation:The LED matrix should circularly display the digits 0 to 9 on LED screen first, then the characters A to Z, as shown in the above figure.
Software
software preparation
The only necessary software is Arduino 1.0, as shown below.
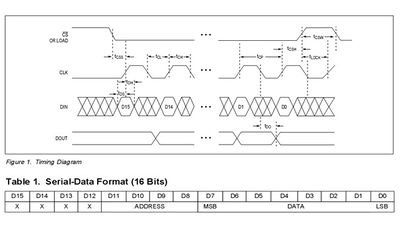
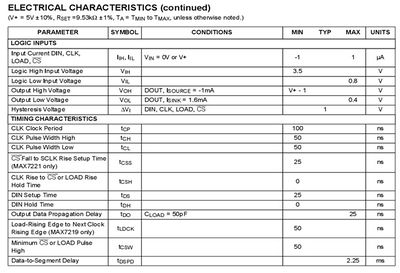
The timing diagram for Max7219 and its Serial-Data Format are attached below with its Electronic Characteristics.
Example code
<syntaxhighlight lang="c">
unsigned char i;
unsigned char j;
/*Port Definitions*/ int Max7219_pinCLK = 10; int Max7219_pinCS = 9; int Max7219_pinDIN = 8;
unsigned char disp1[38][8]={ {0x3C,0x42,0x42,0x42,0x42,0x42,0x42,0x3C},//0 {0x10,0x18,0x14,0x10,0x10,0x10,0x10,0x10},//1 {0x7E,0x2,0x2,0x7E,0x40,0x40,0x40,0x7E},//2 {0x3E,0x2,0x2,0x3E,0x2,0x2,0x3E,0x0},//3 {0x8,0x18,0x28,0x48,0xFE,0x8,0x8,0x8},//4 {0x3C,0x20,0x20,0x3C,0x4,0x4,0x3C,0x0},//5 {0x3C,0x20,0x20,0x3C,0x24,0x24,0x3C,0x0},//6 {0x3E,0x22,0x4,0x8,0x8,0x8,0x8,0x8},//7 {0x0,0x3E,0x22,0x22,0x3E,0x22,0x22,0x3E},//8 {0x3E,0x22,0x22,0x3E,0x2,0x2,0x2,0x3E},//9 {0x8,0x14,0x22,0x3E,0x22,0x22,0x22,0x22},//A {0x3C,0x22,0x22,0x3E,0x22,0x22,0x3C,0x0},//B {0x3C,0x40,0x40,0x40,0x40,0x40,0x3C,0x0},//C {0x7C,0x42,0x42,0x42,0x42,0x42,0x7C,0x0},//D {0x7C,0x40,0x40,0x7C,0x40,0x40,0x40,0x7C},//E {0x7C,0x40,0x40,0x7C,0x40,0x40,0x40,0x40},//F {0x3C,0x40,0x40,0x40,0x40,0x44,0x44,0x3C},//G {0x44,0x44,0x44,0x7C,0x44,0x44,0x44,0x44},//H {0x7C,0x10,0x10,0x10,0x10,0x10,0x10,0x7C},//I {0x3C,0x8,0x8,0x8,0x8,0x8,0x48,0x30},//J {0x0,0x24,0x28,0x30,0x20,0x30,0x28,0x24},//K {0x40,0x40,0x40,0x40,0x40,0x40,0x40,0x7C},//L {0x81,0xC3,0xA5,0x99,0x81,0x81,0x81,0x81},//M {0x0,0x42,0x62,0x52,0x4A,0x46,0x42,0x0},//N {0x3C,0x42,0x42,0x42,0x42,0x42,0x42,0x3C},//O {0x3C,0x22,0x22,0x22,0x3C,0x20,0x20,0x20},//P {0x1C,0x22,0x22,0x22,0x22,0x26,0x22,0x1D},//Q {0x3C,0x22,0x22,0x22,0x3C,0x24,0x22,0x21},//R {0x0,0x1E,0x20,0x20,0x3E,0x2,0x2,0x3C},//S {0x0,0x3E,0x8,0x8,0x8,0x8,0x8,0x8},//T {0x42,0x42,0x42,0x42,0x42,0x42,0x22,0x1C},//U {0x42,0x42,0x42,0x42,0x42,0x42,0x24,0x18},//V {0x0,0x49,0x49,0x49,0x49,0x2A,0x1C,0x0},//W {0x0,0x41,0x22,0x14,0x8,0x14,0x22,0x41},//X {0x41,0x22,0x14,0x8,0x8,0x8,0x8,0x8},//Y {0x0,0x7F,0x2,0x4,0x8,0x10,0x20,0x7F},//Z };
void Write_Max7219_byte(unsigned char DATA) {
unsigned char i;
digitalWrite(Max7219_pinCS,LOW); for(i=8;i>=1;i--)
         {
            digitalWrite(Max7219_pinCLK,LOW);
            digitalWrite(Max7219_pinDIN,DATA&0x80);// Extracting a bit data
            DATA = DATA<<1;
            digitalWrite(Max7219_pinCLK,HIGH);
          }
}
void Write_Max7219(unsigned char address,unsigned char dat)
{
       digitalWrite(Max7219_pinCS,LOW);
       Write_Max7219_byte(address);           //address,code of LED
       Write_Max7219_byte(dat);               //data,figure on LED
       digitalWrite(Max7219_pinCS,HIGH);
}
void Init_MAX7219(void) {
Write_Max7219(0x09, 0x00);       //decoding :BCD
Write_Max7219(0x0a, 0x03);       //brightness
Write_Max7219(0x0b, 0x07);       //scanlimit;8 LEDs
Write_Max7219(0x0c, 0x01);       //power-down mode:0,normal mode:1
Write_Max7219(0x0f, 0x00);       //test display:1;EOT,display:0
}
void setup() {
 pinMode(Max7219_pinCLK,OUTPUT);
 pinMode(Max7219_pinCS,OUTPUT);
 pinMode(Max7219_pinDIN,OUTPUT);
 delay(50);
 Init_MAX7219();
}
void loop()
{
  for(j=0;j<38;j++)
 {
  for(i=1;i<9;i++)
   Write_Max7219(i,disp1[j][i-1]);
  delay(500);
 }
} </syntaxhighlight>
Demo
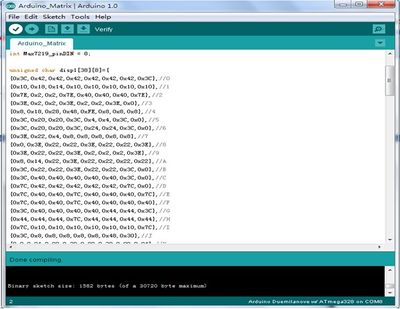
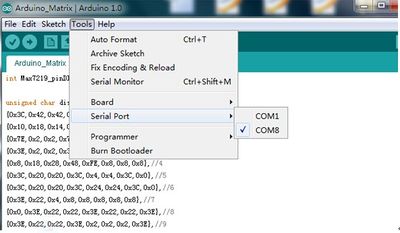
1.Open Arduino development environment.
2.Copy the source code we provide into Arduino compiler, and compile them.
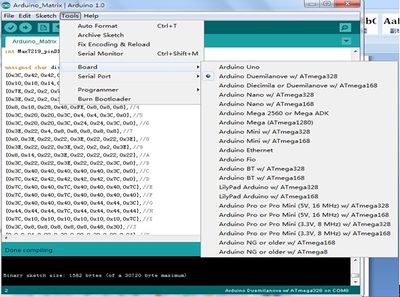
3.Select proper serial port and board.
4.Connect pins according to the schematics, and download codes into Arduino board. You’ll see the LED matrix circularly display the digits 0-9 and the characters A-Z.
pcDuino Sample Code
<syntaxhighlight lang="c">
- include "core.h"
unsigned char i; unsigned char j; int Max7219_pinCLK = 8; int Max7219_pinCS = 9; int Max7219_pinDIN = 10;
unsigned char disp1[38][8] = {
 {0x3C,0x42,0x42,0x42,0x42,0x42,0x42,0x3C},//0
 {0x10,0x30,0x50,0x10,0x10,0x10,0x10,0x10},//1
 {0x7E,0x2,0x2,0x7E,0x40,0x40,0x40,0x7E},//2
 {0x3E,0x2,0x2,0x3E,0x2,0x2,0x3E,0x0},//3
 {0x8,0x18,0x28,0x48,0xFE,0x8,0x8,0x8},//4
 {0x3C,0x20,0x20,0x3C,0x4,0x4,0x3C,0x0},//5
 {0x3C,0x20,0x20,0x3C,0x24,0x24,0x3C,0x0},//6
 {0x3E,0x22,0x4,0x8,0x8,0x8,0x8,0x8},//7
 {0x0,0x3E,0x22,0x22,0x3E,0x22,0x22,0x3E},//8
 {0x3E,0x22,0x22,0x3E,0x2,0x2,0x2,0x3E},//9
 {0x8,0x14,0x22,0x3E,0x22,0x22,0x22,0x22},//A
 {0x3C,0x22,0x22,0x3E,0x22,0x22,0x3C,0x0},//B
 {0x3C,0x40,0x40,0x40,0x40,0x40,0x3C,0x0},//C
 {0x7C,0x42,0x42,0x42,0x42,0x42,0x7C,0x0},//D
 {0x7C,0x40,0x40,0x7C,0x40,0x40,0x40,0x7C},//E
 {0x7C,0x40,0x40,0x7C,0x40,0x40,0x40,0x40},//F
 {0x3C,0x40,0x40,0x40,0x40,0x44,0x44,0x3C},//G
 {0x44,0x44,0x44,0x7C,0x44,0x44,0x44,0x44},//H
 {0x7C,0x10,0x10,0x10,0x10,0x10,0x10,0x7C},//I
 {0x3C,0x8,0x8,0x8,0x8,0x8,0x48,0x30},//J
 {0x0,0x24,0x28,0x30,0x20,0x30,0x28,0x24},//K
 {0x40,0x40,0x40,0x40,0x40,0x40,0x40,0x7C},//L
 {0x81,0xC3,0xA5,0x99,0x81,0x81,0x81,0x81},//M
 {0x0,0x42,0x62,0x52,0x4A,0x46,0x42,0x0},//N
 {0x3C,0x42,0x42,0x42,0x42,0x42,0x42,0x3C},//O
 {0x3C,0x22,0x22,0x22,0x3C,0x20,0x20,0x20},//P
 {0x1C,0x22,0x22,0x22,0x22,0x26,0x22,0x1D},//Q
 {0x3C,0x22,0x22,0x22,0x3C,0x24,0x22,0x21},//R
 {0x0,0x1E,0x20,0x20,0x3E,0x2,0x2,0x3C},//S
 {0x0,0x3E,0x8,0x8,0x8,0x8,0x8,0x8},//T
 {0x42,0x42,0x42,0x42,0x42,0x42,0x22,0x1C},//U
 {0x42,0x42,0x42,0x42,0x42,0x42,0x24,0x18},//V
 {0x0,0x49,0x49,0x49,0x49,0x2A,0x1C,0x0},//W
 {0x0,0x41,0x22,0x14,0x8,0x14,0x22,0x41},//X
 {0x41,0x22,0x14,0x8,0x8,0x8,0x8,0x8},//Y
 {0x0,0x7F,0x2,0x4,0x8,0x10,0x20,0x7F},//Z
 {0x8,0x7F,0x49,0x49,0x7F,0x8,0x8,0x8},// {0xFE,0xBA,0x92,0xBA,0x92,0x9A,0xBA,0xFE},//};
void Write_Max7219_byte(unsigned char DATA) {
unsigned char i;
digitalWrite(Max7219_pinCS,LOW); for(i=8;i>=1;i--)
         {
            digitalWrite(Max7219_pinCLK,LOW);
            if((DATA&0x80)==0x80)  digitalWrite(Max7219_pinDIN,HIGH);
            else                    digitalWrite(Max7219_pinDIN,LOW);
            DATA = DATA<<1;
            digitalWrite(Max7219_pinCLK,HIGH);
         }
}
void Write_Max7219(unsigned char address,unsigned char dat) {
       digitalWrite(Max7219_pinCS,LOW);
       Write_Max7219_byte(address);
       Write_Max7219_byte(dat);
       digitalWrite(Max7219_pinCS,HIGH);
}
void Init_MAX7219(void) {
      Write_Max7219(0x09, 0x00);
      Write_Max7219(0x0a, 0x03);
      Write_Max7219(0x0b, 0x07);
      Write_Max7219(0x0c, 0x01);
      Write_Max7219(0x0f, 0x00);
}
void setup() {
 pinMode(11,OUTPUT);
 pinMode(12,OUTPUT);
 digitalWrite(11,LOW);
 digitalWrite(12,HIGH);
 pinMode(Max7219_pinCLK,OUTPUT);
 pinMode(Max7219_pinCS,OUTPUT);
 pinMode(Max7219_pinDIN,OUTPUT);
 delay(50);
 Init_MAX7219();
}
void loop() {
  for(j=0;j<38;j++)
 {
  for(i=1;i<9;i++)
   Write_Max7219(i,disp1[j][i-1]);
  delay(500);
 }
}
</syntaxhighlight>
