Difference between revisions of "Barometer Sensor (BMP180)"
(→Test tools and test) |
(→Test tools and test) |
||
| (5 intermediate revisions by the same user not shown) | |||
| Line 3: | Line 3: | ||
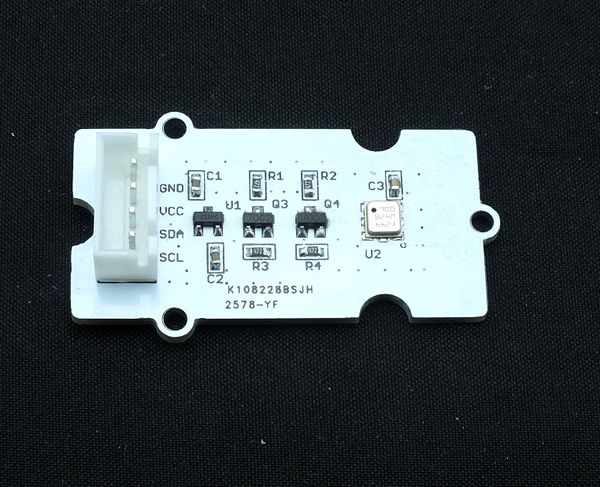
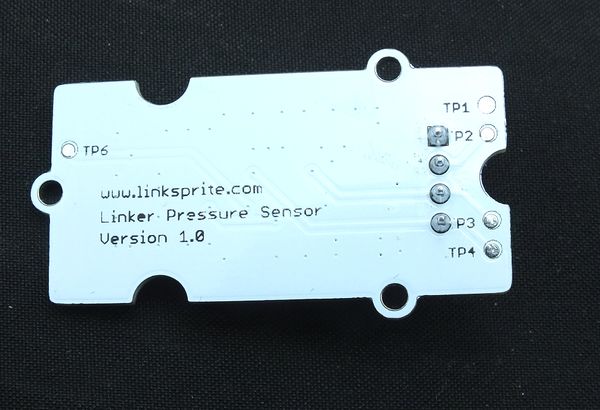
This is a sensor module for the Bosch BMP180 high-precision, low-power digital barometer. The BMP180 offers a pressure measuring range of 300 to 1100 hPa with an accuracy down to 0.02 hPa in advanced resolution mode. It’s based on piezo-resistive technology for high accuracy, ruggedness and long term stability. The chip only accepts 1.8V to 3.6V input voltage. However, with outer circuit added, this module becomes compatible with 3.3V and 5V. Therefore, it can be used on Arduino/Seeeduino or Seeeduino Stalker without modification.It is designed to be connected directly to a micro-controller via the I2C bus. | This is a sensor module for the Bosch BMP180 high-precision, low-power digital barometer. The BMP180 offers a pressure measuring range of 300 to 1100 hPa with an accuracy down to 0.02 hPa in advanced resolution mode. It’s based on piezo-resistive technology for high accuracy, ruggedness and long term stability. The chip only accepts 1.8V to 3.6V input voltage. However, with outer circuit added, this module becomes compatible with 3.3V and 5V. Therefore, it can be used on Arduino/Seeeduino or Seeeduino Stalker without modification.It is designed to be connected directly to a micro-controller via the I2C bus. | ||
| − | [[File:1- | + | [[File:1-212.jpg|600px]] |
| − | [[File:1- | + | [[File:1-213.jpg|600px]] |
== Features == | == Features == | ||
| Line 49: | Line 49: | ||
*Linker Pressure Sensor x1 | *Linker Pressure Sensor x1 | ||
| − | [[File:1-217. | + | [[File:1-217.png]] |
(2)Program | (2)Program | ||
/* SFE_BMP180 library example sketch | /* SFE_BMP180 library example sketch | ||
| + | |||
This sketch shows how to use the SFE_BMP180 library to read the | This sketch shows how to use the SFE_BMP180 library to read the | ||
Bosch BMP180 barometric pressure sensor. | Bosch BMP180 barometric pressure sensor. | ||
https://www.sparkfun.com/products/11824 | https://www.sparkfun.com/products/11824 | ||
| + | |||
Like most pressure sensors, the BMP180 measures absolute pressure. | Like most pressure sensors, the BMP180 measures absolute pressure. | ||
This is the actual ambient pressure seen by the device, which will | This is the actual ambient pressure seen by the device, which will | ||
vary with both altitude and weather. | vary with both altitude and weather. | ||
| + | |||
Before taking a pressure reading you must take a temparture reading. | Before taking a pressure reading you must take a temparture reading. | ||
This is done with startTemperature() and getTemperature(). | This is done with startTemperature() and getTemperature(). | ||
The result is in degrees C. | The result is in degrees C. | ||
| + | |||
Once you have a temperature reading, you can take a pressure reading. | Once you have a temperature reading, you can take a pressure reading. | ||
This is done with startPressure() and getPressure(). | This is done with startPressure() and getPressure(). | ||
The result is in millibar (mb) aka hectopascals (hPa). | The result is in millibar (mb) aka hectopascals (hPa). | ||
| + | |||
If you'll be monitoring weather patterns, you will probably want to | If you'll be monitoring weather patterns, you will probably want to | ||
| Line 76: | Line 81: | ||
To do this, use the sealevel() function. You will need to provide | To do this, use the sealevel() function. You will need to provide | ||
the known altitude at which the pressure was measured. | the known altitude at which the pressure was measured. | ||
| + | |||
If you want to measure altitude, you will need to know the pressure | If you want to measure altitude, you will need to know the pressure | ||
| Line 82: | Line 88: | ||
subsequent altitude readings will be + or - the initial baseline. | subsequent altitude readings will be + or - the initial baseline. | ||
This is done with the altitude() function. | This is done with the altitude() function. | ||
| + | |||
Hardware connections: | Hardware connections: | ||
| + | |||
- (GND) to GND | - (GND) to GND | ||
| + | |||
| + | |||
+ (VDD) to 3.3V | + (VDD) to 3.3V | ||
| + | |||
(WARNING: do not connect + to 5V or the sensor will be damaged!) | (WARNING: do not connect + to 5V or the sensor will be damaged!) | ||
| + | |||
You will also need to connect the I2C pins (SCL and SDA) to your | You will also need to connect the I2C pins (SCL and SDA) to your | ||
Arduino. The pins are different on different Arduinos: | Arduino. The pins are different on different Arduinos: | ||
| + | |||
Any Arduino pins labeled: SDA SCL | Any Arduino pins labeled: SDA SCL | ||
| + | |||
Uno, Redboard, Pro: A4 A5 | Uno, Redboard, Pro: A4 A5 | ||
| + | |||
Mega2560, Due: 20 21 | Mega2560, Due: 20 21 | ||
| + | |||
Leonardo: 2 3 | Leonardo: 2 3 | ||
Leave the IO (VDDIO) pin unconnected. This pin is for connecting | Leave the IO (VDDIO) pin unconnected. This pin is for connecting | ||
the BMP180 to systems with lower logic levels such as 1.8V | the BMP180 to systems with lower logic levels such as 1.8V | ||
| + | |||
Have fun! -Your friends at SparkFun. | Have fun! -Your friends at SparkFun. | ||
| + | |||
The SFE_BMP180 library uses floating-point equations developed by the | The SFE_BMP180 library uses floating-point equations developed by the | ||
Weather Station Data Logger project: http://wmrx00.sourceforge.net/ | Weather Station Data Logger project: http://wmrx00.sourceforge.net/ | ||
| + | |||
Our example code uses the "beerware" license. You can do anything | Our example code uses the "beerware" license. You can do anything | ||
you like with this code. No really, anything. If you find it useful, | you like with this code. No really, anything. If you find it useful, | ||
buy me a beer someday. | buy me a beer someday. | ||
| + | |||
V10 Mike Grusin, SparkFun Electronics 10/24/2013 | V10 Mike Grusin, SparkFun Electronics 10/24/2013 | ||
V1.1.2 Updates for Arduino 1.6.4 5/2015 | V1.1.2 Updates for Arduino 1.6.4 5/2015 | ||
| + | |||
*/ | */ | ||
| − | |||
// Your sketch must #include this library, and the Wire library. | // Your sketch must #include this library, and the Wire library. | ||
// (Wire is a standard library included with Arduino.): | // (Wire is a standard library included with Arduino.): | ||
| − | |||
#include <SFE_BMP180.h> | #include <SFE_BMP180.h> | ||
#include <Wire.h> | #include <Wire.h> | ||
| − | |||
// You will need to create an SFE_BMP180 object, here called "pressure": | // You will need to create an SFE_BMP180 object, here called "pressure": | ||
| − | |||
SFE_BMP180 pressure; | SFE_BMP180 pressure; | ||
| − | |||
#define ALTITUDE 1655.0 // Altitude of SparkFun's HQ in Boulder, CO. in meters | #define ALTITUDE 1655.0 // Altitude of SparkFun's HQ in Boulder, CO. in meters | ||
| − | |||
void setup() | void setup() | ||
{ | { | ||
Serial.begin(9600); | Serial.begin(9600); | ||
Serial.println("REBOOT"); | Serial.println("REBOOT"); | ||
| − | |||
// Initialize the sensor (it is important to get calibration values stored on the device). | // Initialize the sensor (it is important to get calibration values stored on the device). | ||
| − | |||
if (pressure.begin()) | if (pressure.begin()) | ||
Serial.println("BMP180 init success"); | Serial.println("BMP180 init success"); | ||
| Line 139: | Line 152: | ||
// Oops, something went wrong, this is usually a connection problem, | // Oops, something went wrong, this is usually a connection problem, | ||
// see the comments at the top of this sketch for the proper connections. | // see the comments at the top of this sketch for the proper connections. | ||
| − | |||
Serial.println("BMP180 init fail\n\n"); | Serial.println("BMP180 init fail\n\n"); | ||
while(1); // Pause forever. | while(1); // Pause forever. | ||
} | } | ||
} | } | ||
| − | |||
void loop() | void loop() | ||
{ | { | ||
char status; | char status; | ||
double T,P,p0,a; | double T,P,p0,a; | ||
| − | |||
// Loop here getting pressure readings every 10 seconds. | // Loop here getting pressure readings every 10 seconds. | ||
| − | |||
// If you want sea-level-compensated pressure, as used in weather reports, | // If you want sea-level-compensated pressure, as used in weather reports, | ||
// you will need to know the altitude at which your measurements are taken. | // you will need to know the altitude at which your measurements are taken. | ||
// We're using a constant called ALTITUDE in this sketch: | // We're using a constant called ALTITUDE in this sketch: | ||
| − | |||
Serial.println(); | Serial.println(); | ||
Serial.print("provided altitude: "); | Serial.print("provided altitude: "); | ||
| Line 162: | Line 170: | ||
Serial.print(ALTITUDE*3.28084,0); | Serial.print(ALTITUDE*3.28084,0); | ||
Serial.println(" feet"); | Serial.println(" feet"); | ||
| − | |||
// If you want to measure altitude, and not pressure, you will instead need | // If you want to measure altitude, and not pressure, you will instead need | ||
// to provide a known baseline pressure. This is shown at the end of the sketch. | // to provide a known baseline pressure. This is shown at the end of the sketch. | ||
| − | |||
// You must first get a temperature measurement to perform a pressure reading. | // You must first get a temperature measurement to perform a pressure reading. | ||
| − | |||
// Start a temperature measurement: | // Start a temperature measurement: | ||
// If request is successful, the number of ms to wait is returned. | // If request is successful, the number of ms to wait is returned. | ||
// If request is unsuccessful, 0 is returned. | // If request is unsuccessful, 0 is returned. | ||
| − | |||
status = pressure.startTemperature(); | status = pressure.startTemperature(); | ||
if (status != 0) | if (status != 0) | ||
| Line 177: | Line 181: | ||
// Wait for the measurement to complete: | // Wait for the measurement to complete: | ||
delay(status); | delay(status); | ||
| − | |||
// Retrieve the completed temperature measurement: | // Retrieve the completed temperature measurement: | ||
// Note that the measurement is stored in the variable T. | // Note that the measurement is stored in the variable T. | ||
// Function returns 1 if successful, 0 if failure. | // Function returns 1 if successful, 0 if failure. | ||
| − | |||
status = pressure.getTemperature(T); | status = pressure.getTemperature(T); | ||
if (status != 0) | if (status != 0) | ||
| Line 191: | Line 193: | ||
Serial.print((9.0/5.0)*T+32.0,2); | Serial.print((9.0/5.0)*T+32.0,2); | ||
Serial.println(" deg F"); | Serial.println(" deg F"); | ||
| − | |||
// Start a pressure measurement: | // Start a pressure measurement: | ||
// The parameter is the oversampling setting, from 0 to 3 (highest res, longest wait). | // The parameter is the oversampling setting, from 0 to 3 (highest res, longest wait). | ||
// If request is successful, the number of ms to wait is returned. | // If request is successful, the number of ms to wait is returned. | ||
// If request is unsuccessful, 0 is returned. | // If request is unsuccessful, 0 is returned. | ||
| − | |||
status = pressure.startPressure(3); | status = pressure.startPressure(3); | ||
if (status != 0) | if (status != 0) | ||
| Line 202: | Line 202: | ||
// Wait for the measurement to complete: | // Wait for the measurement to complete: | ||
delay(status); | delay(status); | ||
| − | |||
// Retrieve the completed pressure measurement: | // Retrieve the completed pressure measurement: | ||
// Note that the measurement is stored in the variable P. | // Note that the measurement is stored in the variable P. | ||
| Line 208: | Line 207: | ||
// (If temperature is stable, you can do one temperature measurement for a number of pressure measurements.) | // (If temperature is stable, you can do one temperature measurement for a number of pressure measurements.) | ||
// Function returns 1 if successful, 0 if failure. | // Function returns 1 if successful, 0 if failure. | ||
| − | |||
status = pressure.getPressure(P,T); | status = pressure.getPressure(P,T); | ||
if (status != 0) | if (status != 0) | ||
| Line 218: | Line 216: | ||
Serial.print(P*0.0295333727,2); | Serial.print(P*0.0295333727,2); | ||
Serial.println(" inHg"); | Serial.println(" inHg"); | ||
| − | |||
// The pressure sensor returns abolute pressure, which varies with altitude. | // The pressure sensor returns abolute pressure, which varies with altitude. | ||
// To remove the effects of altitude, use the sealevel function and your current altitude. | // To remove the effects of altitude, use the sealevel function and your current altitude. | ||
| Line 224: | Line 221: | ||
// Parameters: P = absolute pressure in mb, ALTITUDE = current altitude in m. | // Parameters: P = absolute pressure in mb, ALTITUDE = current altitude in m. | ||
// Result: p0 = sea-level compensated pressure in mb | // Result: p0 = sea-level compensated pressure in mb | ||
| − | |||
p0 = pressure.sealevel(P,ALTITUDE); // we're at 1655 meters (Boulder, CO) | p0 = pressure.sealevel(P,ALTITUDE); // we're at 1655 meters (Boulder, CO) | ||
Serial.print("relative (sea-level) pressure: "); | Serial.print("relative (sea-level) pressure: "); | ||
| Line 231: | Line 227: | ||
Serial.print(p0*0.0295333727,2); | Serial.print(p0*0.0295333727,2); | ||
Serial.println(" inHg"); | Serial.println(" inHg"); | ||
| − | |||
// On the other hand, if you want to determine your altitude from the pressure reading, | // On the other hand, if you want to determine your altitude from the pressure reading, | ||
// use the altitude function along with a baseline pressure (sea-level or other). | // use the altitude function along with a baseline pressure (sea-level or other). | ||
// Parameters: P = absolute pressure in mb, p0 = baseline pressure in mb. | // Parameters: P = absolute pressure in mb, p0 = baseline pressure in mb. | ||
// Result: a = altitude in m. | // Result: a = altitude in m. | ||
| − | |||
a = pressure.altitude(P,p0); | a = pressure.altitude(P,p0); | ||
Serial.print("computed altitude: "); | Serial.print("computed altitude: "); | ||
| Line 251: | Line 245: | ||
} | } | ||
else Serial.println("error starting temperature measurement\n"); | else Serial.println("error starting temperature measurement\n"); | ||
| − | |||
delay(5000); // Pause for 5 seconds. | delay(5000); // Pause for 5 seconds. | ||
} | } | ||
| − | |||
(3)Test Results | (3)Test Results | ||
| − | [[File:1-218. | + | [[File:1-218.png]] |
== Documents == | == Documents == | ||
[https://github.com/sparkfun/BMP180_Breakout_Arduino_Library Test code download] | [https://github.com/sparkfun/BMP180_Breakout_Arduino_Library Test code download] | ||
Latest revision as of 02:55, 20 April 2016
Contents
Introduction
This is a sensor module for the Bosch BMP180 high-precision, low-power digital barometer. The BMP180 offers a pressure measuring range of 300 to 1100 hPa with an accuracy down to 0.02 hPa in advanced resolution mode. It’s based on piezo-resistive technology for high accuracy, ruggedness and long term stability. The chip only accepts 1.8V to 3.6V input voltage. However, with outer circuit added, this module becomes compatible with 3.3V and 5V. Therefore, it can be used on Arduino/Seeeduino or Seeeduino Stalker without modification.It is designed to be connected directly to a micro-controller via the I2C bus.
Features
- Digital two wire (I2C) interface
- Wide barometric pressure range
- Flexible supply voltage range
- Ultra-low power consumption
- Low noise measurement
- Factory-calibrated
- -40 to +85°C operational range, ±2°C temperature accuracy
- I2C address: 0x77
Application Ideas
- Enhancement of GPS navigation
- Indoor and outdoor navigation
- Leisure and sports
- Weather forecast
- Vertical velocity indication (rise/sink speed)
Specifications
Usage
With Arduino Barometric condition is one of the criteria used to predict coming change in weather and deduce altitude above sea level. Here is a demo to show you how to read the barometric data from this Grove - Barometer Sensor (BMP180). 1. Connect it to IIC port of Seeeduino or Grove - Base Shield via a Grove cable. And connect Arduino to PC via a USB cable. 2. Download the library(the barometer library is shared by Grove - Barometer Sensor (BMP180) and Grove - Barometer Sensor(BMP085));Unzip it into the libraries file of Arduino IDE by the path: ..\arduino-1.0.1\libraries. 3. Create a new Arduino sketch and paste the codes below to it or open the code directly by the path:File -> Example ->Barometer_Sensor->Barometer_Sensor.
Test tools and test
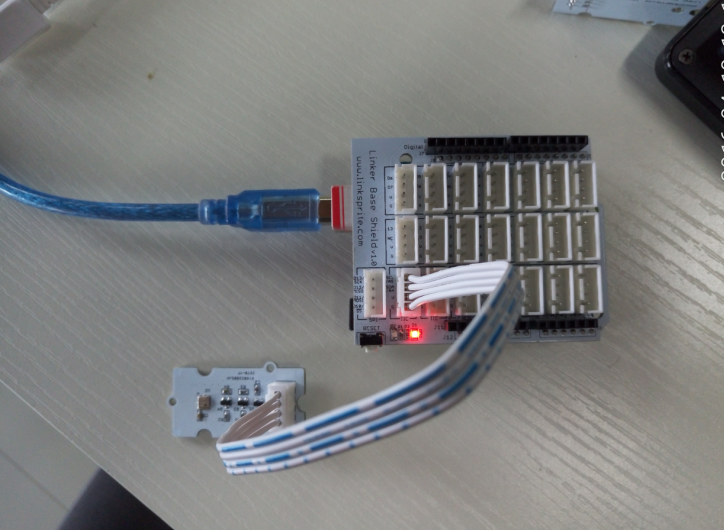
(1)Test tools
- Arduino UNO x 1
- Linker Base Shield x 1
- Linker Pressure Sensor x1
(2)Program
/* SFE_BMP180 library example sketch
This sketch shows how to use the SFE_BMP180 library to read the
Bosch BMP180 barometric pressure sensor.
https://www.sparkfun.com/products/11824
Like most pressure sensors, the BMP180 measures absolute pressure.
This is the actual ambient pressure seen by the device, which will
vary with both altitude and weather.
Before taking a pressure reading you must take a temparture reading.
This is done with startTemperature() and getTemperature().
The result is in degrees C.
Once you have a temperature reading, you can take a pressure reading.
This is done with startPressure() and getPressure().
The result is in millibar (mb) aka hectopascals (hPa).
If you'll be monitoring weather patterns, you will probably want to
remove the effects of altitude. This will produce readings that can
be compared to the published pressure readings from other locations.
To do this, use the sealevel() function. You will need to provide
the known altitude at which the pressure was measured.
If you want to measure altitude, you will need to know the pressure
at a baseline altitude. This can be average sealevel pressure, or
a previous pressure reading at your altitude, in which case
subsequent altitude readings will be + or - the initial baseline.
This is done with the altitude() function.
Hardware connections:
- (GND) to GND
+ (VDD) to 3.3V
(WARNING: do not connect + to 5V or the sensor will be damaged!)
You will also need to connect the I2C pins (SCL and SDA) to your
Arduino. The pins are different on different Arduinos:
Any Arduino pins labeled: SDA SCL
Uno, Redboard, Pro: A4 A5
Mega2560, Due: 20 21
Leonardo: 2 3
Leave the IO (VDDIO) pin unconnected. This pin is for connecting the BMP180 to systems with lower logic levels such as 1.8V
Have fun! -Your friends at SparkFun.
The SFE_BMP180 library uses floating-point equations developed by the
Weather Station Data Logger project: http://wmrx00.sourceforge.net/
Our example code uses the "beerware" license. You can do anything
you like with this code. No really, anything. If you find it useful,
buy me a beer someday.
V10 Mike Grusin, SparkFun Electronics 10/24/2013
V1.1.2 Updates for Arduino 1.6.4 5/2015
 */
 // Your sketch must #include this library, and the Wire library.
 // (Wire is a standard library included with Arduino.):
 #include <SFE_BMP180.h>
 #include <Wire.h>
 // You will need to create an SFE_BMP180 object, here called "pressure":
 SFE_BMP180 pressure;
 #define ALTITUDE 1655.0 // Altitude of SparkFun's HQ in Boulder, CO. in meters
 void setup()
 {
 Serial.begin(9600);
 Serial.println("REBOOT");
 // Initialize the sensor (it is important to get calibration values stored on the device).
 if (pressure.begin())
 Serial.println("BMP180 init success");
 else
 {
 // Oops, something went wrong, this is usually a connection problem,
 // see the comments at the top of this sketch for the proper connections.
 Serial.println("BMP180 init fail\n\n");
 while(1); // Pause forever.
 }
 }
 void loop()
 {
 char status;
 double T,P,p0,a;
 // Loop here getting pressure readings every 10 seconds.
 // If you want sea-level-compensated pressure, as used in weather reports,
 // you will need to know the altitude at which your measurements are taken.
 // We're using a constant called ALTITUDE in this sketch:
 Serial.println();
 Serial.print("provided altitude: ");
 Serial.print(ALTITUDE,0);
 Serial.print(" meters, ");
 Serial.print(ALTITUDE*3.28084,0);
 Serial.println(" feet");
 // If you want to measure altitude, and not pressure, you will instead need
 // to provide a known baseline pressure. This is shown at the end of the sketch.
 // You must first get a temperature measurement to perform a pressure reading.
 // Start a temperature measurement:
 // If request is successful, the number of ms to wait is returned.
 // If request is unsuccessful, 0 is returned.
 status = pressure.startTemperature();
 if (status != 0)
 {
 // Wait for the measurement to complete:
 delay(status);
 // Retrieve the completed temperature measurement:
 // Note that the measurement is stored in the variable T.
 // Function returns 1 if successful, 0 if failure.
 status = pressure.getTemperature(T);
 if (status != 0)
 {
 // Print out the measurement:
 Serial.print("temperature: ");
 Serial.print(T,2);
 Serial.print(" deg C, ");
 Serial.print((9.0/5.0)*T+32.0,2);
 Serial.println(" deg F");
 // Start a pressure measurement:
 // The parameter is the oversampling setting, from 0 to 3 (highest res, longest wait).
 // If request is successful, the number of ms to wait is returned.
  // If request is unsuccessful, 0 is returned.
 status = pressure.startPressure(3);
 if (status != 0)
 {
 // Wait for the measurement to complete:
 delay(status);
 // Retrieve the completed pressure measurement:
 // Note that the measurement is stored in the variable P.
 // Note also that the function requires the previous temperature measurement (T).
 // (If temperature is stable, you can do one temperature measurement for a number of pressure measurements.)
 // Function returns 1 if successful, 0 if failure.
 status = pressure.getPressure(P,T);
 if (status != 0)
 {
 // Print out the measurement:
 Serial.print("absolute pressure: ");
 Serial.print(P,2);
 Serial.print(" mb, ");
 Serial.print(P*0.0295333727,2);
 Serial.println(" inHg");
 // The pressure sensor returns abolute pressure, which varies with altitude.
 // To remove the effects of altitude, use the sealevel function and your current altitude.
 // This number is commonly used in weather reports.
 // Parameters: P = absolute pressure in mb, ALTITUDE = current altitude in m.
 // Result: p0 = sea-level compensated pressure in mb
 p0 = pressure.sealevel(P,ALTITUDE); // we're at 1655 meters (Boulder, CO)
 Serial.print("relative (sea-level) pressure: ");
 Serial.print(p0,2);
 Serial.print(" mb, ");
 Serial.print(p0*0.0295333727,2);
 Serial.println(" inHg");
 // On the other hand, if you want to determine your altitude from the pressure reading,
 // use the altitude function along with a baseline pressure (sea-level or other).
 // Parameters: P = absolute pressure in mb, p0 = baseline pressure in mb.
 // Result: a = altitude in m.
 a = pressure.altitude(P,p0);
 Serial.print("computed altitude: ");
 Serial.print(a,0);
 Serial.print(" meters, ");
 Serial.print(a*3.28084,0);
 Serial.println(" feet");
 }
 else Serial.println("error retrieving pressure measurement\n");
 }
 else Serial.println("error starting pressure measurement\n");
 }
 else Serial.println("error retrieving temperature measurement\n");
 }
 else Serial.println("error starting temperature measurement\n");
 delay(5000);  // Pause for 5 seconds.
 }
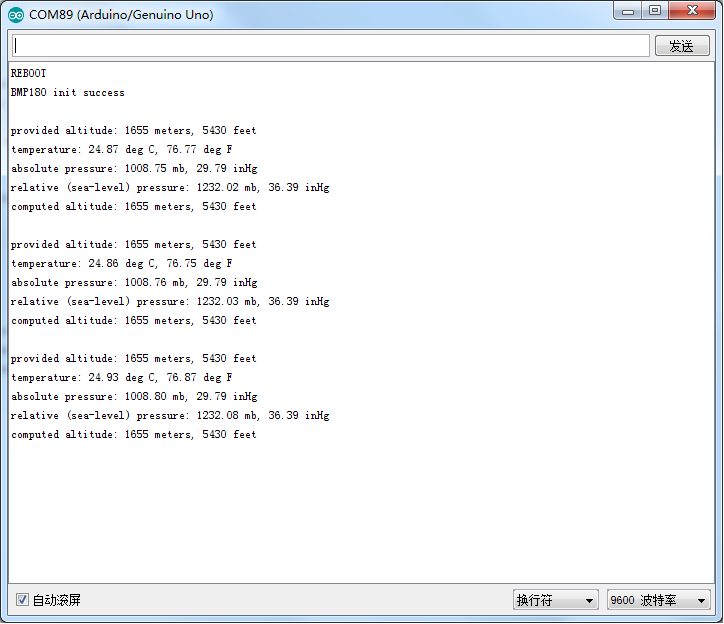
(3)Test Results


