Difference between revisions of "Remote controller kit"
(→Remote controller kit) |
(→Remote controller kit) |
||
| Line 1: | Line 1: | ||
== Remote controller kit == | == Remote controller kit == | ||
| + | Recently, we have developed an open source remote controller which includes LinkNode D1 and Infrared shield. Users can take this remote controller and android APP to control home appliances like TV, air conditioner which can replace the IR controller. | ||
| + | |||
| + | |||
| + | [[File:Remote controller kit 001.jpg| 640px]] | ||
| + | |||
| + | == Features == | ||
| + | |||
| + | *LinkNode D1 | ||
| + | *Infrared Shield | ||
| + | *Connecting to LinkSpriteIO IoT cloud server | ||
| + | *Learning Infrared encoding | ||
| + | |||
| + | |||
| + | == Tutorial == | ||
| + | |||
| + | === Prerequisites === | ||
| + | |||
| + | '''Hardware''' | ||
| + | |||
| + | *LinkNode D1 x 1 | ||
| + | *Infrared Shield x 1 | ||
| + | *One home appliance supporting IR remote control | ||
| + | |||
| + | |||
| + | '''Software''' | ||
| + | |||
| + | *Arduino IDE 1.6.8 with ESP8266 Arduino core | ||
| + | |||
| + | |||
| + | |||
| + | === Basic working flow === | ||
| + | |||
| + | *1.Login linksprite.io and create a remote device on the platform | ||
| + | *2.Makers program the reference Arduino project to LinkNode D1 and let it connect to LinkSpriteIO | ||
| + | *3.APP will connect to LlinkSpriteIO and list the Remote device | ||
| + | *4.Learn the infrared encoding from your IR remote controller | ||
| + | *5.Use APP to control your home appliance | ||
| − | |||
[[File:Remote controller kit 002.png]] | [[File:Remote controller kit 002.png]] | ||
| + | |||
| + | |||
| + | === Details === | ||
| + | |||
| + | a. Login LinkSprite.io | ||
| + | |||
| + | *Go to My devices --> Create DIY device | ||
| + | *Create new device: | ||
| + | **Device Name: any name | ||
| + | **Device Type: 00(Custom Device type) | ||
| + | **Group Name : Remote | ||
| + | |||
| + | |||
[[File:Remote controller kit 003.png]] | [[File:Remote controller kit 003.png]] | ||
| + | |||
| + | |||
| + | *Open the new created Device and get DeviceID | ||
[[File:Remote controller kit 004.png]] | [[File:Remote controller kit 004.png]] | ||
| + | *Go to My profile to get your own API key. | ||
| + | |||
| + | [[File:Remote controller kit 005.png]] | ||
| + | |||
| + | b. Download the source code from github | ||
| + | |||
| + | *Download the source code from github and put the IRremoteESP8266-master folder to your (Arduino IDE PATH)/libraries directory | ||
| + | *Open Arduino IDE and make sure you have installed the ESP8266 hardware packages, details you can check here | ||
| + | *Go to File->Examples->IRremoteESP8266-->LinkNodeRemote and open it | ||
| − | |||
[[File:Remote controller kit 006.png]] | [[File:Remote controller kit 006.png]] | ||
| + | |||
| + | |||
| + | *Update your own apikey and deviceID | ||
[[File:Remote controller kit 007.png]] | [[File:Remote controller kit 007.png]] | ||
| + | |||
| + | *Program this project to LinkNode D1. | ||
| + | |||
| + | |||
| + | |||
| + | *Program this project to LinkNode D1. | ||
| + | |||
| + | c. Download and install Android APP | ||
| + | |||
| + | **Download the Android APP file from github | ||
| + | **Use your account to sign in linksprite.io | ||
[[File:Remote controller kit 008.png]] | [[File:Remote controller kit 008.png]] | ||
| + | |||
| + | |||
| + | *After that APP will list the device group which we create before | ||
| + | |||
| + | [[File:Remote controller kit 009.png]] | ||
| + | |||
| + | |||
| + | *Click this device group, and add remote device | ||
| + | |||
| + | [[File:Remote controller kit 010.png]] | ||
| + | |||
| + | |||
| + | *Choose a button on the APP, press it and hold on | ||
| + | *At the same time, press corresponding button on your IR remote controller | ||
| + | *The LinkNode D1 will record this button's infrared encoding, then send a signal to tell APP, it has already get this button's infrared encoding! | ||
| + | *APP will highlight this button. If you want to learn more button, repeat the steps above | ||
| + | *After all, you can click button on APP to send command to LinkNode D1 via linkspriteIO | ||
| + | *LinkNode D1 will resend the infrared signal which is recorded before | ||
| + | |||
| + | [[File:Remote controller kit 011.png]] | ||
| + | |||
| + | Using this open source Remote controller and APP, the IR controller of home appliance should be completely replaced. | ||
| + | |||
| + | Enjoy it! | ||
| + | |||
| + | ==Ref == | ||
| + | |||
| + | 1. [http://www.linksprite.com/wiki/index.php5?title=LinkNode_D1 Install ESP8266 hardware core for Arduino IDE] | ||
Revision as of 07:04, 22 June 2016
Contents
Remote controller kit
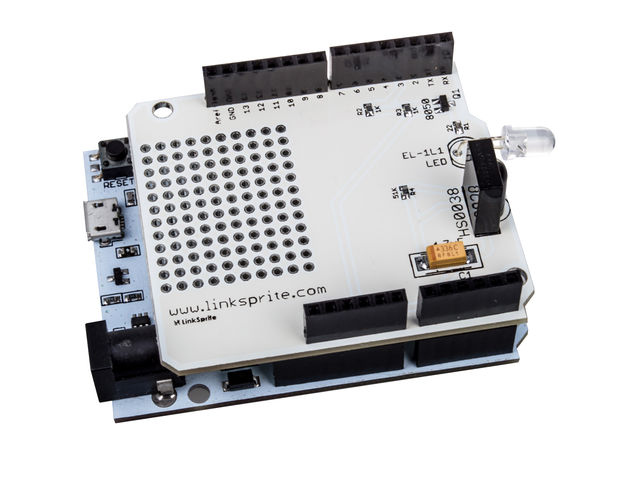
Recently, we have developed an open source remote controller which includes LinkNode D1 and Infrared shield. Users can take this remote controller and android APP to control home appliances like TV, air conditioner which can replace the IR controller.
Features
- LinkNode D1
- Infrared Shield
- Connecting to LinkSpriteIO IoT cloud server
- Learning Infrared encoding
Tutorial
Prerequisites
Hardware
- LinkNode D1 x 1
- Infrared Shield x 1
- One home appliance supporting IR remote control
Software
- Arduino IDE 1.6.8 with ESP8266 Arduino core
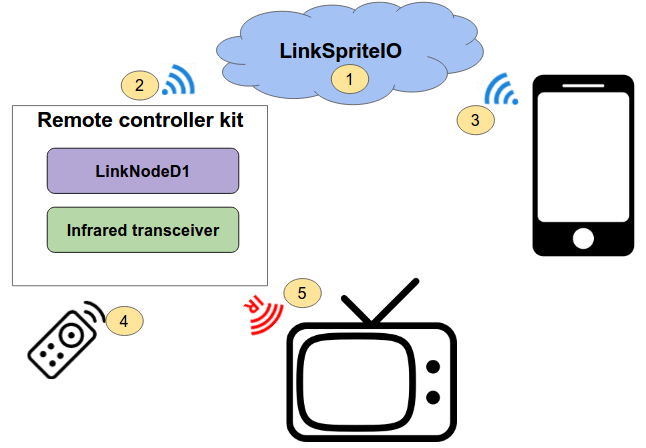
Basic working flow
- 1.Login linksprite.io and create a remote device on the platform
- 2.Makers program the reference Arduino project to LinkNode D1 and let it connect to LinkSpriteIO
- 3.APP will connect to LlinkSpriteIO and list the Remote device
- 4.Learn the infrared encoding from your IR remote controller
- 5.Use APP to control your home appliance
Details
a. Login LinkSprite.io
- Go to My devices --> Create DIY device
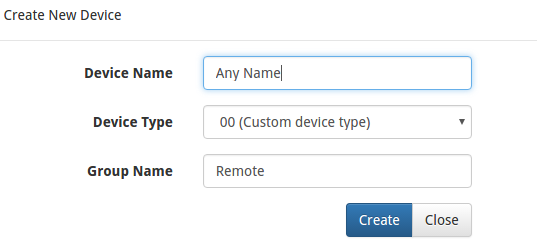
- Create new device:
- Device Name: any name
- Device Type: 00(Custom Device type)
- Group Name : Remote
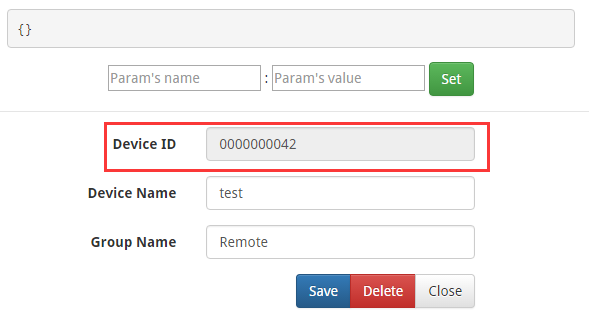
- Open the new created Device and get DeviceID
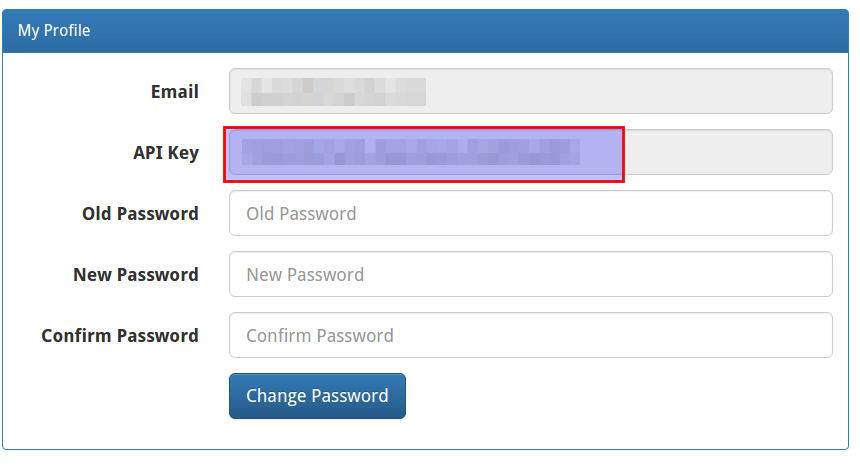
- Go to My profile to get your own API key.
b. Download the source code from github
- Download the source code from github and put the IRremoteESP8266-master folder to your (Arduino IDE PATH)/libraries directory
- Open Arduino IDE and make sure you have installed the ESP8266 hardware packages, details you can check here
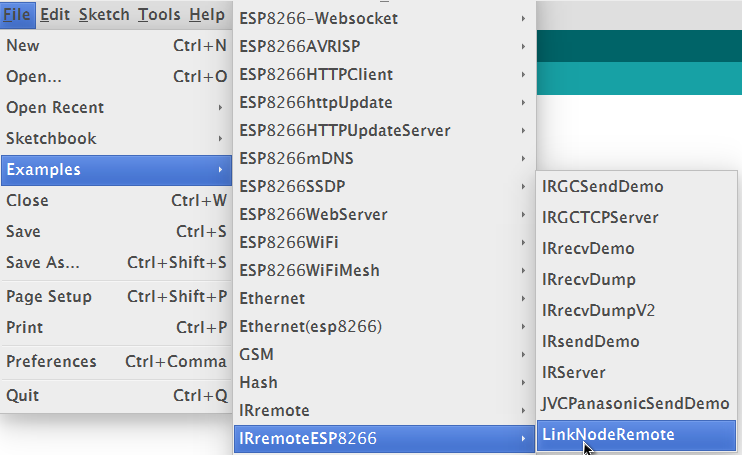
- Go to File->Examples->IRremoteESP8266-->LinkNodeRemote and open it
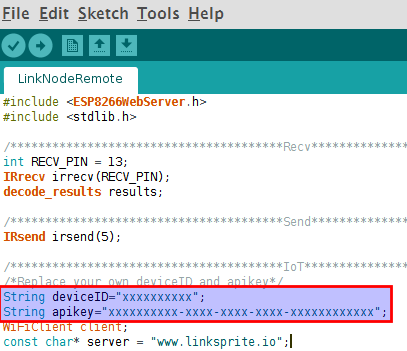
- Update your own apikey and deviceID
- Program this project to LinkNode D1.
- Program this project to LinkNode D1.
c. Download and install Android APP
- Download the Android APP file from github
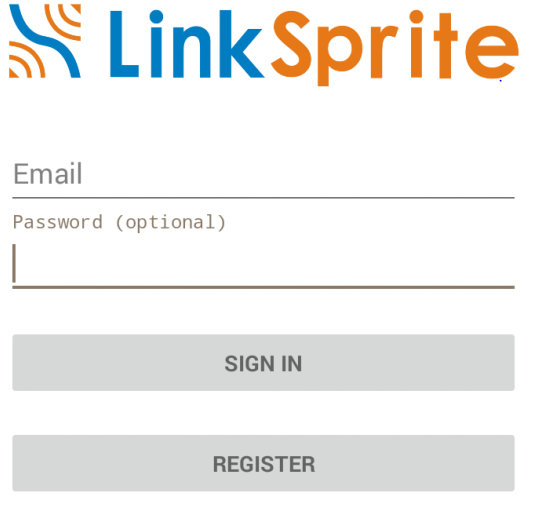
- Use your account to sign in linksprite.io
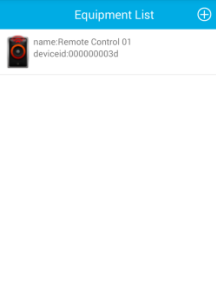
- After that APP will list the device group which we create before
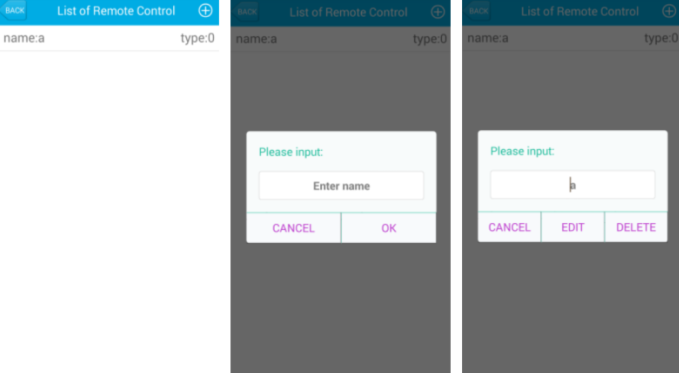
- Click this device group, and add remote device
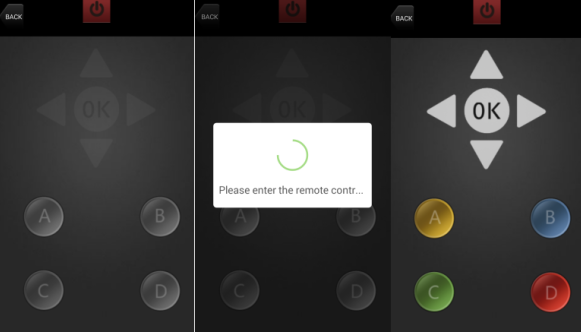
- Choose a button on the APP, press it and hold on
- At the same time, press corresponding button on your IR remote controller
- The LinkNode D1 will record this button's infrared encoding, then send a signal to tell APP, it has already get this button's infrared encoding!
- APP will highlight this button. If you want to learn more button, repeat the steps above
- After all, you can click button on APP to send command to LinkNode D1 via linkspriteIO
- LinkNode D1 will resend the infrared signal which is recorded before
Using this open source Remote controller and APP, the IR controller of home appliance should be completely replaced.
Enjoy it!
