Difference between revisions of "Analog pH Meter Kit"
(→Usage) |
(→Usage) |
||
| Line 46: | Line 46: | ||
Connecting Diagram | Connecting Diagram | ||
| − | [[File:450px-PH_meter_connection1_(1). | + | [[File:450px-PH_meter_connection1_(1).png]] |
== Steps == | == Steps == | ||
Revision as of 14:04, 30 June 2016
Contents
[hide]Introduction
Need to measure water quality and other parameters but haven't got any low cost pH meter? Find it difficult to use with Arduino? Here comes an analog pH meter, specially designed for Arduino controllers and has built-in simple, convenient and practical connection and features. It has an LED which works as the Power Indicator, a BNC connector and PH2.0 sensor interface. You can just connect the pH sensor with BNC connector, and plug the PH2.0 interface into any analog input on Arduino controller to read pH value easily.
Specification
- SEN0161 dimension
- Module Power: 5.00V
- Circuit Board Size: 43mm×32mm
- pH Measuring Range: 0-14
- Measuring Temperature: 0-60 ℃
- Accuracy: ± 0.1pH (25 ℃)
- Response Time: ≤ 1min
- pH Sensor with BNC Connector
- PH2.0 Interface ( 3 foot patch )
- Gain Adjustment Potentiometer
- Power Indicator LED
Precautions
- Before and after use of the pH electrode every time, you need to use (pure)water to clean it.
- The electrode plug should be kept clean and dry in case of short circuit.
- Preservation: Electrode reference preservation solution is the 3N KCL solution.
- Measurement should be avoided staggered pollution between solutions, so as not to affect the accuracy of measurement.
- Electrode blub or sand core is defiled which will make PTS decline, slow response. So, it should be based on the characteristics of the pollutant, adapted to the cleaning solution, the electrode performance recovery.
- Electrode when in use, the ceramic sand core and liquid outlet rubber ring should be removed, in order to make salt bridge solution to maintain a certain velocity.
NOTE: Differences between the probes, SEN0161 and SEN0169
Their usages/ specifications are almost the same. The differences locates at
*Long-firing Operation: SEN0169 supports, while SEN0161 NOT, i.e. you can not immerse SEN0161 in water for Continuous Testing.
*Life Span: In 25 ℃, pure water, do Continuous Testing with them both, SEN0169 can work two years, while SEN0161 can only last for 6 months. And just for reference, if put them in turbid, strongly acid and alkali solution, 25℃, the  life span would drop to one year (SEN0169), 1 month(or shorter, SEN0161).
**Tempreture, pH, turbidity of the water effect the probe life span a lot.
*Waterproof: You can immerse the whole probe SEN0169 into the water, while you can only immerse the front part of the probe SEN0161, the electrode glass bulb, into water, the rear part, from the white shell to the cable, MUST NOT be  under water.
*Strongly Acid and Alkali: SEN0169 are preferred for strongly acid and alkali test. And if your testing range is usually within pH6~8, then SEN0161 is capable for that.
pH Electrode Characteristics
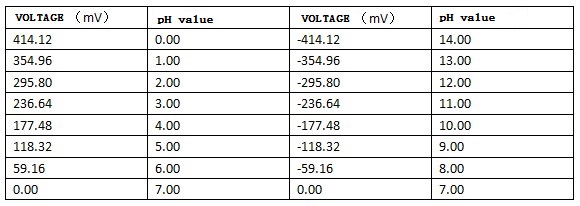
The output of pH electrode is Millivolts, and the pH value of the relationship is shown as follows (25 ℃):
NOTE: It is normal that if your reading is much different with the table since you are not reading from the electrode directly but from the voltage adapter, it has converted the original voltage (-5V ~ +5V) to Arduino compatible voltage, i.e. 0 ~ 5V. See the discussion on Forum.
Usage
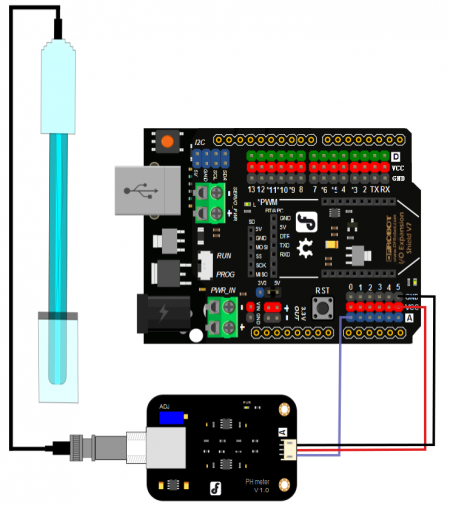
Connecting Diagram
Steps
1.Connect according to the graphic, that is, the pH electrode is connected to the BNC connector on the pH meter board, and then use the connection lines, the pH meter board is connected to the analog port 0 of the Arduino controller. When the Arduino controller gets power, you will see the blue LED on board is on. 2.Upload the sample code to the Arduino controller. 3.Put the pH electrode into the standard solution whose pH value is 7.00, or directly short circuit the input of the BNC connector. Open the serial monitor of the Arduino IDE, you can see the pH value printed to it, and the error does not exceed 0.3. Record the pH value printed, then compared with 7.00, and the difference should be changed into the "Offset" in the sample code. For example, the pH value printed is 6.88, so the difference is 0.12. You should change the # define Offset 0.00 into # define Offset 0.12 in the sample code. 4.Fine adjustment
- For Acid solution: Put the pH electrode into the pH standard solution whose value is 4.00. Then wait about a minute, adjust the Gain Potential device, let the value stabilise at around 4.00. At this time, the acidic calibration has been completed and you can measure the pH value of an acidic solution.
- For Alkaline solution: According to the linear characteristics of pH electrode itself, after the above calibration, you can directly measure the pH value of the alkaline solution, but if you want to get a better accuracy, you can recalibrate it with the standard solution, pH = 9.18. Also adjust the gain potential device, let the value stabilise at around 9.18. After this calibration, you can measure the pH value of the alkaline solution.
 NOTE:
 *If you want to measure the pH value of other solution, you must wash the pH electrode first!
 *The power supply is closer to +5.00V, the more accurate pH reading you could get.
Sample Code
Sample code for testing the PH meter and get the sensor feedback from the Arduino Serial Monitor.
 /*
  # This sample code is used to test the pH meter V1.0.
  # Editor : YouYou
  # Ver    : 1.0
  # Product: analog pH meter
  # SKU    : SEN0161
 */
 #define SensorPin A0            //pH meter Analog output to Arduino Analog Input 0
 #define Offset 0.00            //deviation compensate
 #define LED 13
#define samplingInterval 20
 #define printInterval 800
 #define ArrayLenth  40    //times of collection
 int pHArray[ArrayLenth];   //Store the average value of the sensor feedback
 int pHArrayIndex=0;
 void setup(void)
 {
   pinMode(LED,OUTPUT);
   Serial.begin(9600);
   Serial.println("pH meter experiment!");    //Test the serial monitor
 }
 void loop(void)
 {
 static unsigned long samplingTime = millis();
 static unsigned long printTime = millis();
 static float pHValue,voltage;
 if(millis()-samplingTime > samplingInterval)
 {
     pHArray[pHArrayIndex++]=analogRead(SensorPin);
     if(pHArrayIndex==ArrayLenth)pHArrayIndex=0;
     voltage = avergearray(pHArray, ArrayLenth)*5.0/1024;
     pHValue = 3.5*voltage+Offset;
     samplingTime=millis();
 }
 if(millis() - printTime > printInterval)   //Every 800 milliseconds, print a numerical, convert the state of the LED indicator
 {
   Serial.print("Voltage:");
       Serial.print(voltage,2);
       Serial.print("    pH value: ");
   Serial.println(pHValue,2);
       digitalWrite(LED,digitalRead(LED)^1);
       printTime=millis();
 }
}
 double avergearray(int* arr, int number){
 int i;
 int max,min;
 double avg;
 long amount=0;
 if(number<=0){
   Serial.println("Error number for the array to avraging!/n");
   return 0;
 }
 if(number<5){   //less than 5, calculated directly statistics
   for(i=0;i<number;i++){
     amount+=arr[i];
   }
   avg = amount/number;
   return avg;
 }else{
   if(arr[0]<arr[1]){
     min = arr[0];max=arr[1];
   }
   else{
     min=arr[1];max=arr[0];
   }
   for(i=2;i<number;i++){
     if(arr[i]<min){
       amount+=min;        //arr<min
       min=arr[i];
     }else {
       if(arr[i]>max){
         amount+=max;    //arr>max
         max=arr[i];
       }else{
         amount+=arr[i]; //min<=arr<=max
       }
     }//if
   }//for
   avg = (double)amount/(number-2);
 }//if
 return avg;
}
FAQ
Q1. My PH sensor readings are not correct, what did I miss? Or the module is defective? A. 1. Check if the pH sensor circuit board is good? Read on the Forum. or on wiki for the steps. During the transport, there might be crash causing the probe head cracked, please check if the probe is good or not. 2. If you don't use Arduino as the controller, then please check your ADC module that whether it converts the 5V analog input to 1024, if it is 4096(or other byte), please re-determine the equation in the code.
Q2. Big fluctuations in ph meter readings. When I make measurements in a glass, I have correct, stable reading. But when I put it inside the aquarium with the pumping system working, the easurement varies even more than a degree, and it's not stable, if I swicth off the pump the given value doesn´t oscilate anymore. A. There should be NO working electrical device in the container. Any tiny leakage of electricity will cause the probe working error. Especially, many people bought the EC meter and put it into the same tank for the test, but then the pH meter cannot work well anymore. Please seperate them into different containers, or turning off the EC meter when using the pH meter.
Q3. May I know the Maximum range different if we do not calibrate the pH meter. A. The maximum range differs from probe, you have to calibrate it before use if the pH probe was kept long.
Q4. I would just like to ask if your pH sensor can be connect to any micro controller aside from arduino. Would it be compatible with a raspberry pi? Thank You! A. Yes, it can be used on any device as long as it could give 5V power supply and accept 5V analog signal, but as the Rasp pi is only compatible with 3.3V sensor, so an expansion shield is suggested to use with (please make sure which kind of Pi you use)
For any questions and more cool ideas to share, please visit DFRobot Forum
Documents
PH meter temperature compensation guide Schematic PCB Design layout pH Electrode Manual, SEN0161 is E-201 in this manual, and SEN0169 is another band which share the same character with SEN0161. Zips For All Above

