Xbee Shield
Contents
Introduction
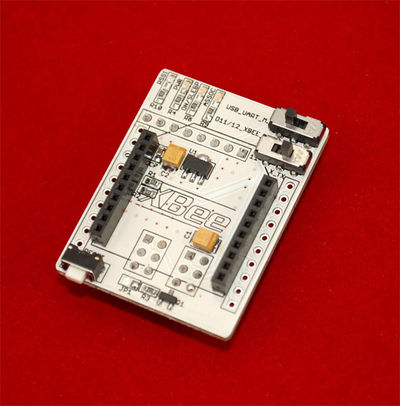
A Xbee shield allows an Arduino board to communicate wirelessly using Bee compatible modules (like Zigbee or BlueTooth Bee). It is designed to be used with Xbee module from MaxStream. It can be used as a Serial Port / USB replacement. It is used to connect two Arduino using Zigbee / Bluetooth Bee or connect a Arduino with PC Wirelessly. Two toggle switches decides how Rxd and Txd pins of Bee modules be connected to Arduino pins. These two switches provides options to connect RxD and TxD lines of Bee Modules to Arduino Hardware Serial Port or Digital pins 11 and 12 or FTDI RxD and Txd Pins.
Features
- 31mm X 41mm board.
- Communicate with Arduino
- Via pin 11, 12 Software Serial Port or
- Via hardware Serial Port
- Xbee modules can be configured by X-CTU via USB
- Breakout of all pins
Application Ideas
- Communicate two Arduinos Wirelessly using Bee Modules (XBee Pro Series2 RF module|Xbee,Bluetooth Bee|BluetoothBee,RFbee V1.1 - Wireless Arduino compatible node|RFBee)
- Communicate Arduino to PC Wirelessly using Bee Modules.
- Connecting GPS Bee kit (with Mini Embedded Antenna)|GPS Bee to Arduino
Cautions
- Set the toggle switches to correct position before connecting to Bee Modules or Arduinos.
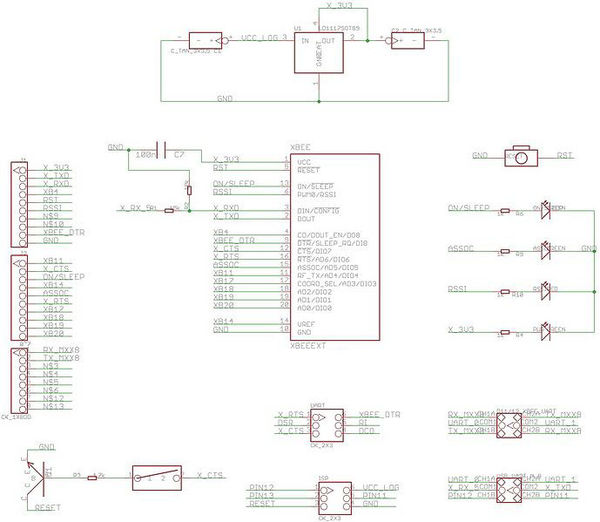
Schematic
Usage
A Bee module is connected to Arduino / Seeeduino via the XBee Shield. In case of a Seeeduino, set the operating voltage switch to 3.3V position. Normally the Bee modules are connected via Software Serial Port by setting the toggle switches (TOG_1 and TOG_2)positions to left-side. Please refer the below tables for different configuration.
Hardware Installation
Xbee Shield Outline and Toggle Switch Position
| TOG_1 | TOG_2 | Xbee Tx Connected to | Xbee Rx Connected to |
|---|---|---|---|
| Left | Left | Digital pin 11 | Digital pin 12 |
| Left | Right | FT232 RxD | FT232 TxD |
| Right | Left | Digital pin 11 | Digital pin 12 |
| Right | Right | Atmege RxD | Atmege TxD |
| TOG_1 | TOG_2 | Xbee Tx Connected to | Xbee Rx Connected to |
|---|---|---|---|
| Left | Left | Digital pin 51 | Digital pin 50 |
| Left | Right | FT232 RxD | FT232 TxD |
| Right | Left | Digital pin 51 | Digital pin 50 |
| Right | Right | Atmege RxD0 | Atmege TxD0 |
Testing AT commands on Bees
Create a new sketch with the following code and download it into your Arduino board.
<syntaxhighlight lang="c"> //Serial Relay - Arduino will patch a //serial link between the computer and the Bee Shield //at 9600 bps 8-N-1 //Computer is connected to Hardware UART //Bee Shield is connected to the Software UART
- include <NewSoftSerial.h>
- define RxD 11
- define TxD 12
NewSoftSerial mySerial(RxD,TxD);
void setup() {
   pinMode(RxD, INPUT);
   pinMode(TxD, OUTPUT);
   mySerial.begin(9600);               // the Bee baud rate
   Serial.begin(9600);                 // the terminal baud rate
}
void loop() {
   if(Serial.available())
   {
      mySerial.print((unsigned char)Serial.read());
    }
   else  if(mySerial.available())
   {
      Serial.print((unsigned char)mySerial.read());
    }
}
</syntaxhighlight>
After this fire up your favorite serial terminal software, choose the COM port for Arduino, set it to operate at default baud rate of your Bee (XBee default is 9600 8-N-1), connect and send the commands. Try sending "+++" (without the quotes) for XBee module, to the Arduino board. The XBee should respond by sending back an "OK".
Programming
The following sketch configures Bluetooth Bee as Slave Device and waits for connection request from PC or other master device. Bluetooth Bee is connected to Arduino via XBee®_Shield as shown above.
<syntaxhighlight lang="c">
/*
This demo code is free software; you can redistribute it and/or modify it under the terms of the GNU Lesser General Public License as published by the Free Software Foundation; either version 2.1 of the License, or (at your option) any later version.
This library is distributed in the hope that it will be useful, but WITHOUT ANY WARRANTY; without even the implied warranty of MERCHANTABILITY or FITNESS FOR A PARTICULAR PURPOSE. See the GNU Lesser General Public License for more details.
You should have received a copy of the GNU Lesser General Public License along with this library; if not, write to the Free Software Foundation, Inc., 51 Franklin St, Fifth Floor, Boston, MA 02110-1301 USA
- /
- include <NewSoftSerial.h> //Software Serial Port
- define RxD 11
- define TxD 12
- define DEBUG_ENABLED 1
NewSoftSerial blueToothSerial(RxD,TxD);
void setup() { pinMode(RxD, INPUT); pinMode(TxD, OUTPUT); setupBlueToothConnection(); }
void loop() { //Typical Bluetoth command - response simulation: //Type 'a' from PC Bluetooth Serial Terminal //See Wiki for instructions
 if(blueToothSerial.read() == st0">'a')
 {
   blueToothSerial.println(st0">"You are connected"); //You can     write you BT communication logic here
 }
}
void setupBlueToothConnection() {
 blueToothSerial.begin(38400); //Set BluetoothBee BaudRate to default baud rate 38400
 delay(1000);
 sendBlueToothCommand(\r\n+STWMOD=0\r\n");
 sendBlueToothCommand(\r\n+STNA=SeeeduinoBluetooth\r\n");
 sendBlueToothCommand(\r\n+STAUTO=0\r\n");
 sendBlueToothCommand(\r\n+STOAUT=1\r\n");
 sendBlueToothCommand(\r\n +STPIN=0000\r\n");
 delay(2000); // This delay is required.
 sendBlueToothCommand(\r\n+INQ=1\r\n");
 delay(2000); // This delay is required.
}
//Checks if the response "OK" is received
void CheckOK()
{
char a,b;
 while(1)
 {
   if(blueToothSerial.available()) { a = blueToothSerial.read();   if(st0">'O' == a)
   {
     // Wait for next character K. available() is required in some cases, as K is not immediately available.
     while(blueToothSerial.available())
     {
        b = blueToothSerial.read();
        break;
     }

     if('K' == b)
     {
       break;
     }
   }
 }
}
 while( (a = blueToothSerial.read()) sy3">!= sy2">-1)
 {
    //Wait until all other response chars are received
 }
}
void sendBlueToothCommand(char command[])
{
  blueToothSerial.print(command);
  CheckOK();
}
</syntaxhighlight>

