IR Sensor
Introduction
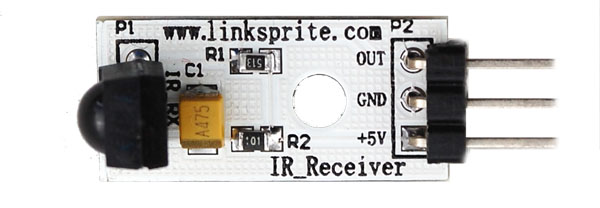
The IR sensor is miniaturized receivers for infrared remote control systems.
The pin diode and preamplifier are assembled on lead frame, the epoxy package is designed as IR filter.
The demodulated output signal can directly be decoded by a microprocessor. The IR sensor is the standard IR remote control receiver series, supporting all major transmission codes.
Example Project
Hardware Setup
We can use any of the digital input signals to receive the input from a 38KHz IR receiver module.
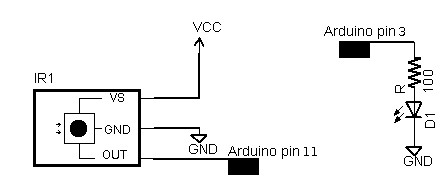
Simply wire power to pin 1, ground to pin 2, and the pin 3 output to an arduino digital input pin, e.g. 11.
These receivers provide a filtered and demodulated inverted logic level output. You can't just use a photodiode or phototransistor. These detectors have pretty good range and easily work across a room.
For output, connect an IR LED and appropriate resistor to PWM output pin 3. Make sure the polarity of the LED is correct, or it won't illuminate - the long lead is positive.
How to send
This infrared remote library consists of two parts: the “IRsend” transmits IR remote packets, while the “IRrecv” receives and decodes an IR message. The “IRsend” uses an infrared LED connected to output pin 3.
To send a message, call the send method for the desired protocol with the data to send and the number of bits to send. The “examples/IRsendDemo” sketch provides a simple example of how to send codes:
<syntaxhighlight lang="c">
- include <IRremote.h>
IRsend irsend;
void setup() {
Serial.begin(9600);
}
void loop() {
 if (Serial.read() != -1) {
   for (int i = 0; i < 3; i++) {
     irsend.sendSony(0xa90, 12); // Sony TV power code
     delay(100);
   }
 }
}
</syntaxhighlight>
This sketch sends a Sony TV power on/off code whenever a character is sent to the serial port, allowing the arduino to turn the TV on or off. (Note that Sony codes must be sent 3 times according to the protocol.)
How to receive
The “IRrecv” uses an infrared detector connected to any digital input pin.
The “examples/IRrecvDemo” sketch provides a simple example of how to receive codes:
<syntaxhighlight lang="c">
- include <IRremote.h>
int RECV_PIN = 11; IRrecv irrecv(RECV_PIN); decode_results results;
void setup() {
 Serial.begin(9600);
 irrecv.enableIRIn(); // Start the receiver
}
void loop() {
 if (irrecv.decode(&results)) {
   Serial.println(results.value, HEX);
   irrecv.resume(); // Receive the next value
 }
}
</syntaxhighlight>
The “IRrecv” class performs the decoding, and is initialized with enableIRIn(). The decode() method is called to see if a code has been received. If so, it returns a nonzero value and puts the results into the decode_results structure. (For details of this structure, see the “examples/IRrecvDump” sketch.) Once a code has been decoded, the resume() method must be called to resume receiving codes. Note that decode() does not block. The sketch can perform other operations while waiting for a code because the codes are received by an interrupt routine.

