Difference between revisions of "Acrylic Turtle 2WD Mobile Video Robot powered by pcDuino2"
Qian.zhang (talk | contribs) (→Introduction) |
Qian.zhang (talk | contribs) (→Assembly Instruction) |
||
| Line 32: | Line 32: | ||
== Assembly Instruction == | == Assembly Instruction == | ||
| − | *[http:// | + | == Assembly Instruction == |
| + | *For the frame of robot assembly instruction, please refer to here: http://linksprite.com/wiki/index.php5?title=Acrylic_Frame_Robot_Platform#Assembly_Instructions | ||
| + | |||
| + | ===Firmware of pcDuino2=== | ||
| + | *Write Kernel: | ||
| + | **Use [https://s3.amazonaws.com/pcduino/Tools/PhoenixCardV306_20120302.rar PhoenixCard.exe] write [http://pan.baidu.com/s/1bnqz4hp pcduino_a10_kernel_livesuit_20140504.img] to a SD card. | ||
| + | |||
| + | [[File:write kernel_v2_1.jpg]] | ||
| + | |||
| + | **Insert the SD card to pcDuino2 and power on. You will find the Tx LED on pcDuino2 blink. Wait a moment , the Tx LED will stop blink, this indicates that the kernel is write to pcDuino2, power off pcDuino2 and take out the SD card. | ||
| + | |||
| + | [[File:write kernel_v2_2.jpg]] | ||
| + | |||
| + | *Write Firmware: | ||
| + | **Format the last step's SD card, copy the [http://pan.baidu.com/s/1bnqz4hp image] to the SD card. | ||
| + | |||
| + | [[File:write firmware_v2.jpg]] | ||
| + | |||
| + | **Connect pcDuino2 with HDMI screen and power on it, when you see: | ||
| + | |||
| + | searching update.sh from usb disk | ||
| + | searching update.sh from sdcard | ||
| + | |||
| + | Insert the SD card to pcDuino2, you will see: | ||
| + | |||
| + | it will take about 10 minutes to finish… | ||
| + | |||
| + | Then wait servel minutes, the screen will remind you update finished. | ||
| + | |||
| + | ===Install pcDuino2 On The Robot=== | ||
== Resources == | == Resources == | ||
*[https://s3.amazonaws.com/linksprite/robot/pcDuino+V2+video+robot/pcduino_car_with_video_9V_20140509.7z Firmware of pcDuino V2(Green WiFi Module)] | *[https://s3.amazonaws.com/linksprite/robot/pcDuino+V2+video+robot/pcduino_car_with_video_9V_20140509.7z Firmware of pcDuino V2(Green WiFi Module)] | ||
*[https://s3.amazonaws.com/linksprite/robot/pcDuino+V2+video+robot/WiFiRobot.apk WiFiRobot.apk] | *[https://s3.amazonaws.com/linksprite/robot/pcDuino+V2+video+robot/WiFiRobot.apk WiFiRobot.apk] | ||
Revision as of 06:30, 2 February 2015
Contents
Introduction
The new robot with acrylic frame and video surveillance, it uses pcDuino V2 as control board.
Package List
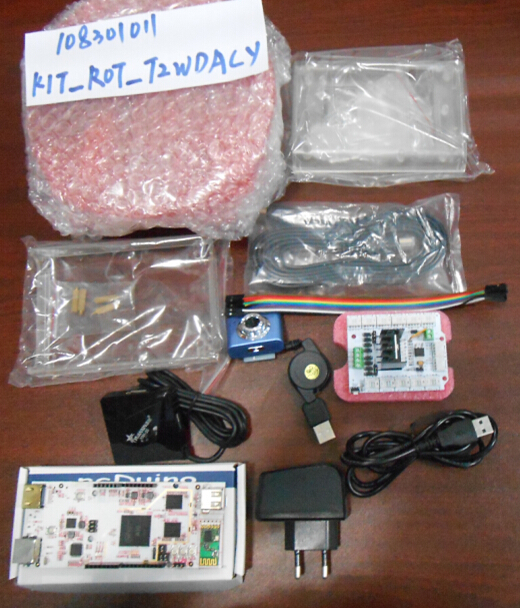
- 1 × pcDuino V2[MP_PCDUINOV2][102102006]
- 1 × Mini Webcam for Robot Video Real Time Video Stream[WEBCAM_PCDUINO][108202004-1]
- 1 × Motor Shield[SHD_MOTOR][101101014][SHD_MOTOR][101101014]
- 1 × Acrylic Frame Robot Platform [KIT_ROT_T2WDACY][108301011]
- 1 × Wall Power Adapter (5V 2A)[POW_5V2AUSB_EU][126201003]
- 1 × Micro USB cable[CAB_uB][117201004]
- 1 × 4 port USB hub[TOL-USBHUB-4PT][125201004]
- 1 × HDMI cable[CAB_HDMI][117201007]
- 1 × Clear Case V2
- 1 × LinkSprite Clear Enclosure for pcDuino[COM_CASE_PCDUINO_CLEAR] [114201005]
- 1 × Acrylic Baffle Plate for pcDuino V2[CASE_PCDV2END][128201001]
- 1 × Plate of Case[COM_CASE_ARDU_CLEAR_PLATE][114201003]
- 10× 2.54mm to 2.0mm Jumper Wire[IT_JUMR_FF2.54_2.0MM_WI20CM][BB101101]
Assembly Instruction
Assembly Instruction
- For the frame of robot assembly instruction, please refer to here: http://linksprite.com/wiki/index.php5?title=Acrylic_Frame_Robot_Platform#Assembly_Instructions
Firmware of pcDuino2
- Write Kernel:
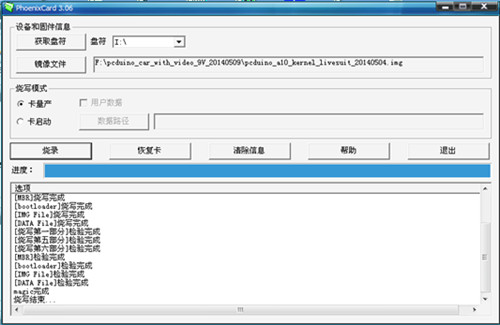
- Use PhoenixCard.exe write pcduino_a10_kernel_livesuit_20140504.img to a SD card.
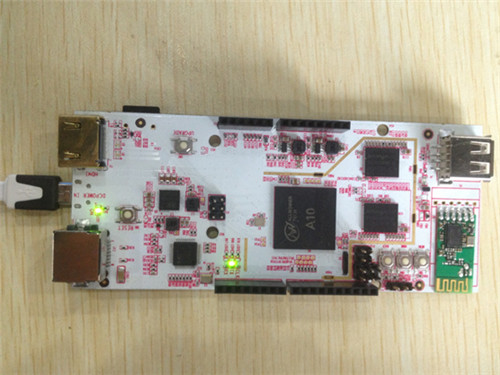
- Insert the SD card to pcDuino2 and power on. You will find the Tx LED on pcDuino2 blink. Wait a moment , the Tx LED will stop blink, this indicates that the kernel is write to pcDuino2, power off pcDuino2 and take out the SD card.
- Write Firmware:
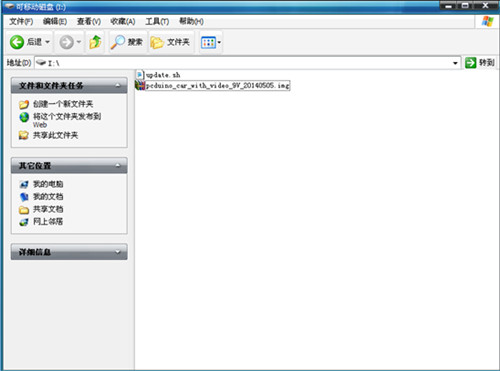
- Format the last step's SD card, copy the image to the SD card.
- Connect pcDuino2 with HDMI screen and power on it, when you see:
 searching update.sh from usb disk
 searching update.sh from sdcard
Insert the SD card to pcDuino2, you will see:
it will take about 10 minutes to finish…
Then wait servel minutes, the screen will remind you update finished.


