Difference between revisions of "LED strip driver"
Katherine.d (talk | contribs) (→Introduction) |
Katherine.d (talk | contribs) (→Introduction) |
||
| Line 8: | Line 8: | ||
It can drive an LED strip 1 to 2 meters long with 9 V, while 1 to 5 meters long with 12 V. The driver in conjunction with the colorful LED strips can add a wonderful effect to indoor or outdoor usages | It can drive an LED strip 1 to 2 meters long with 9 V, while 1 to 5 meters long with 12 V. The driver in conjunction with the colorful LED strips can add a wonderful effect to indoor or outdoor usages | ||
| + | |||
| + | [[File:strip drvier.jpg]] | ||
== Features == | == Features == | ||
Revision as of 05:49, 4 December 2012
Contents
Introduction
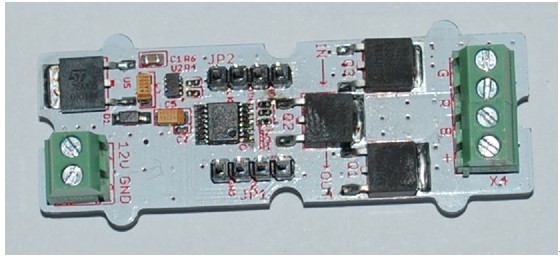
The LED Strip Driver with a 4-pin interface provides easy connectivity to your standard Arduino device.
It can help you control the luminance of a single-color LED strip, as well as the color and the luminance of an RGB LED strip through Arduino.
It has 2 terminals and 2 interfaces. The power for LED strip comes in through the 2-pin terminal. And the LED controlling voltages output through the 4-pin terminal. The 2 interfaces are screen-printed “IN” for controlling data input and “OUT” for controlling data shared with the next strip driver, respectively.
It can drive an LED strip 1 to 2 meters long with 9 V, while 1 to 5 meters long with 12 V. The driver in conjunction with the colorful LED strips can add a wonderful effect to indoor or outdoor usages
Features
Application Ideas
Cautions
Schematic
Specification
Pin definition and Rating
Mechanic Dimensions
Usage
Hardware Installation
Programming
FAQ
Please list your question here:
Support
If you have questions or other better design ideas, you can go to our forum to discuss or creat a ticket for your issue at linksprite support.
Resources
How to buy
See Also
Other related products and resources.
Licensing
This documentation is licensed under the Creative Commons Attribution-ShareAlike License 3.0 Source code and libraries are licensed under GPL/LGPL, see source code files for details.
